Wednesday, November 15, 2023

Create a fancy GIFT CARD HOLDER featuring the MERRY BOLD & BRIGHT SUITE


Start with a POPPY PARADE card base cut at 4-1/4in by 5-1/2in.  Layer a piece of  coordinating DSP measuring 4in by 5-1/4in on top of the card base. 

For the “fold out” piece, use a piece of MELON MAMBO cut at 9-3/4in by 4-1/4in and scored at 3-1/4in and 6-1/2in.  Adhere the back panel of the “fold out” to a POPPY PARADE card panel cut at 3-1/8in by 4in.  Then adhere the entire “fold out” portion to the card base. 

For the panels on the “fold out” section, cut two DSP pieces and a BASIC WHITE piece at 3-1/2in by 4-1/2in.  Pocket panel for the lower panel is a piece of DSP cut at 3-1/8in by 2in.   . 

To embellish the card, die cut three Christmas bulbs using GRANNY APPLE GREEN, BLUEBERRY BUSHEL and POOL PARTY card stock.  Using BLUEBERRY BUSHEL INK, stamp the filament stamp on each bulb.  Die cut three bulb sockets and a light string using SHADED SPRUCE card stock.  Adhere the string across the top of the panel using TOMBOW and add the three lights using DIMENSIONALS.  Stamp the sentiment on a 5/8in CRUSHED CURRY strip using SHADED SPRUCE ink.  Add to the card with DIMENSIONALS.

Stamp the inside sentiment on the center section and add the small strip of DSP on the bottom to create a pocket. Place TEAR N TAPE on the bottom and sides of the strip, attach to the bottom of the panel and slide in the gift card.

To see how the gift card holder comes together, click on the YOUTUBE link below.


All the products used for this project are available in my online store.  Just click here and go shopping

The Wexford Stamper's Online Store


Monday, November 13, 2023

MONDAY FUN DAY- SLIM LINE CARD and coordinating envelope using the MERRY BOLD & BRIGHT SUITE


If you are looking for a bright and contemporary group of products for your Christmas projects this year, then MERRY BOLD & BRIGHT is the suite for you.


The fun Christmas lights are the star of the show along with the beautiful DSP, including MELON MAMBO and GRANNY APPLE GREEN FOIL PAPER. When I saw the string die in the die set, I immediately thought about a slim line card with a fabulous string of bright and shiny lights.  

Start with a piece of BASIC BLACK card stock measuring 8-1/2in by 7in.  Score at 3-1/2in on the SHORT side.  Cut out four MELON MAMBO and three GRANNY APPLE GREEN light die cuts using the FOIL SHEETS.  Cut out two light strings and seven bulb sockets using SHADED SPRUCE card stock.  Add the strings to the card front using TOMBOW as shown.  Adhere the light bulb pieces to the socket pieces and add to the card front using DIMENSIONALS.  

For the sentiment, cut a 5/8in strip of BASIC WHITE card stock, stamp the sentiment using GRANNY APPLE GREEN ink and add to the card front using DIMENSIONALS.  Add a BASIC WHITE card stock panel measuring 3-1/4in by 8-1/4in for the insert.

This card will fit in a regular business size envelope but if you are feeling creative and want to make a coordinating envelope, it's really easy.

Start with a piece of DSP measuring 10-3/4in by 8in.  On the LONG side, score at 1/2in, 9-1/4in. On the SHORT side, score at 3-3/4in and 7-1/2in.  Cut away the small square at the corner and then the large top flap on that same panel.  Place TEAR N TAPE on the 1/2in panel along the side and seal.  Then close up the bottom of the envelope once the side is sealed.  Round the corners of the flap if desired. To see how this project comes together click on the YOUTUBE video here.


The products used for this project are available in my online store.  Just click below.


With Thanksgiving next week, we know that Christmas is around the corner. Get started NOW on all those projects on your list.  Check back next week for more great holiday ideas.

Keep Stampin',

Barb Reed

The Wexford Stamper


Wednesday, November 1, 2023

WOW YOUR FRIENDS Create a SHADOW BOX FUN FOLD CARD for the holidays.


The project for this blog post is a clever FUN FOLD originally created by LISA CURCIO at LISA'S STAMP STUDIO.  I fell in love with the design and wanted to share it.  For my card I'll be using the MERRY BOLD & BRIGHT SUITE in the holiday catalog.  Usually very traditional Christmas stamper, I have fallen in love with this very bright and contemporary set of products.


The MERRY & BRIGHT BUNDLE is a cute photopolymer stamp with Christmas lights and sentiments.  The coordinating dies create adorable strings of lights with lots of detail.


The DSP uses a unique holiday color palate as well as some beautiful foil paper for good measure.


To embellish the projects, the suite offers IRRIDESCENT RIBBON and IRRIDESCENT FLAT DOTS.


To create the card, start with two large panels.  For the front panel cut a piece of POOL PARTY card stock at 4-1/4in by 11in.  Score at 1-1/2in and 5-1/2in.  For the pop up panel, cut a POOL PARTY card stock panel measuring 4-1/4in by 7in, scored at 1-1/2in and 5-1/2in.

On the POP UP, add two pieces of DSP, one measuring 4in by 3-3/4in and one 4in by 1-1/4in. using TOMBOW.  Using a set of layering dies, die cut using the largest die the center of the largest panel on the POP UP.  Save that piece for the card front.

To create the floating sentiment, create a tag using the next two dies in the layered set.  Cut the larger shape in GRANNY APPLE GREEN card stock and the smaller in BASIC WHITE card stock.  Layer them together and stamp the HAVE A, MERRY and CHRISTMAS sentiments using BLUEBERRY BUSHEL, GRANNY APPLE GREEN and POPPY PARADE INK.  Fussy cut them out of the BASIC WHITE card stock and adhere them to the layered piece.

Create the "floating effect" by cutting a 3-3/4in by 1/2in strip of WINDOW SHEET.  Adhere the piece to the center of the strip then line it up in the opening created by the large die and secure the ends of the strip inside the shadow box with MINI GLUE DOTS.  Put aside.

For the card base, add a 3-3/4in by 4in piece of BASIC WHITE card stock with a 4in by 1in piece of DSP at the bottom of the inside panel.  Add a coordinating DSP panel of the same size in the remaining large inside space.  Apply glue to the two smaller panels of the POP UP section and adhere it to the card base.  Close the card.

To finish the front of the card, add a piece of DSP on the top panel of the card front measuring 4in by 3-3/4in.  Add the large die cut from the POP UP panel using DIMENSIONALS.  Add a set of lights by die cutting two lights (POPPY PARADE and GRANNY APPLE GREEN), filaments and caps (SHADED SPRUCE).  Tie together using IRRIDESCENT RIBBON and add to the card front using DIMENSIONALS.  Stamp the sentiment in BLUEBERRY BUSHEL INK on a POOL PARTY card stock strip measuring 5/8in by 2-3/4in.  Add to card front using DIMENSIONALS.

To see how this fun fold card comes together, click below to see the YOU TUBE video.


If you would like a downloadable PDF project sheet, click here.


All the products used for this project are available in my online store.  The link is below.


Thanks as always for stopping by. I'm just getting started sharing my projects using the MERRY BOLD & BRIGHT SUITE.  Hope you are inspired to make something yourself.

Keep Stampin'

Barb Reed
The Wexford Stamper


Monday, October 30, 2023

FUN DAY MONDAY- Hand Cream Gift Box featuring the MERRY BOLD & BRIGHT SUITE


Halloween is just days away so that means the holiday season is fast approaching.  Time to think about all those little gifts you need for all the people in your life.  The teachers, your neighbors, your coworkers, your friends, the UPS guy, the mail man.... yikes!!  We have some work to do.  The project in this post is quick to put together and everyone will love it.  At this time of year, I make a trip to my local BATH & BODYWORKS and pick up some great smelling items.  I will be using the hand cream for this gift box.

I've made lots of hand cream boxes in the past but this design, originally shared by ERICA CERWIN of PINK BUCKAROO DESIGNS is the best I've seen.  

1) To create the box, cut three pieces of BLUEBERRY BUSHEL card stock.  For the body of the box, cut the panel at 2in by 10-1/2in. Score at 4-3/4in and 5-3/4in.  For the flap, cut at 2in by 3-5/8in.  Score on the LONG end at 1/2in and 1-1/2in. For the inside piece cut at 3-1/2in by 6in and score at 1in on all sides.

2) To create the exterior, adhere the flap at the top of the outside panel so it folds over to create the box.  The remaining panel will create the inside of the box where the lotion tube fits.  Before assembling it, punch a hole in either short end using the 3/4in CIRCLE PUNCH.  Cut out the tabs and assemble.  Remove the lid of the tube, put through the hole and replace the lid.  Adhere this interior piece on the inside of the exterior piece.

3) Before placing the DSP on the outside of the box add a magnet to the large folded panel using a MINI GLUE DOT.  Adhere a 1-7/8in by 4-1/2in piece of DSP.  Add a coordinating piece of DSP measuring 1-7/8in by 2in after placing the second magnet on the flap.  Add two assembled Christmas bulbs and IRIDESCENT RIBBON on the flap as shown.  Add sentiment at the bottom right of the box.

The video link below will show you how the gift box came together.


All the products used to make this project are available in my online store.  Check it out here.


There you have it.  A quick and easy project you can put together for all those friends and family gifts.  I hope you are inspired to try one yourself.  Come back soon for more holiday gift ideas.

Keep Stampin'

Barb Reed
The Wexford Stamper


Tuesday, October 24, 2023

MONDAY FUN DAY with The Wexford Stamper- Cocoa & Biscotti Treat Box featuring the JOY OF CHRISTMAS SUITE


Happy Monday Stampers!!!  The project in this post is a customer request.  With the holidays quickly approaching, everyone is looking for simple but unique gifts for give.  Cocoa is always a great gift to give, especially if it's paired with something sweet. I have two samples in the picture above but for the video linked below, I will share a box created using the JOY OF CHRISTMAS SUITE.


This suite has two amazing bundles, each with great images, sentiments and coordinating dies.


The paper is also a gorgeous addition with an additional foil paper offering.


To create the treat box, start with a piece of CRUMB CAKE card stock measuring 7-1/2in by 9-3/4in.  On the LONG side, score at 1-1/4in and 8-1/4in.  On the SHORT side, score at 1/2in, 2-3/4in, 4in, and 6-1/4in.  Your box should look like the template below after the card stock is creased and the excess is cut away.


Before assembling the box, adhere two pieces of DSP each measuring 2-1/8in by 6-7/8 to the large panels on the box.  Place adhesive on the 1/2in panel and fold box together.  Apply adhesive to bottom flaps and close.  

For the tag, cut out a 4in long tag from the TAILORED TAGS DIES using a coordinating DSP.  Cut out the NOEL letters using the foiled wood grain DSP.  Die cut the square die using CHERRY COBBLER card stock and adhere the letters as shown in the picture.  Next, adhere the square to the tag using DIMENSIONALS.  At the bottom of the tag adhere a SHADED SPRUCE pine sprig and three HOLIDAY GEMS.

Pinch together the top of the box and tie closed with a piece of ribbon.  Tie the tag to the ribbon using a piece of the METALLIC GOLD TRIM.

To see how the project comes together, check out the YOUTUBE video below.


For a PDF project sheet for this treat box, click here.


All the products used for this project are available in my online store.  Click below and get shopping.


Starting next week, I will switch gears and share some more holiday projects featuring the MERRY, BOLD & BRIGHT SUITE.  You are going to love these contemporary and bright products.

Stamp away in the holidays,

Barb Reed
The Wexford Stamper


Wednesday, October 18, 2023

Gift Tag and Envelope Card featuring the JOY OF CHRISTMAS SUITE


The holidays are coming and I wanted to share with you a quick and easy gift for that special friend or coworker.  Are you a BATH & BODY WORKS addict?  Do you just love going in the store, wander around sniffing bottles and checking out sales?  Me too.  I know everyone I know would love a gift from that amazing store.  For today's project, I just created a pretty tag for a holiday hand soap and a coordinating card featuring the JOY OF CHRISTMAS SUITE.  Love these projects, especially the DSP.


For the tag, I cut out two concentric circles using the LAYERING CIRCLE DIES.  For the 2-3/4in circle, I cut out a piece of the gold foil wood grain DSP.  For the 2-1/2in circle, I cut out a piece of CHERRY COBBLER card stock.  On the CHERRY COBBLER circle, emboss the sentiment using VERSAMARK INK and GOLD EMBOSSING POWDER. Layer the two circles together.

On a scrap of BASIC WHITE card stock, stamp the greenery branch image using VERSAMARK INK and emboss using GOLD EMBOSSING POWDER.  Color in the holly berries using CHERRY COBBLER BLENDS and cut out using the coordinating die.  Adhere the branch to the tag using DIMENSIONALS.

Punch a hole in the top of the tag, string a piece of the METALLIC GOLD TRIM through the hole and tie to the neck of the hand soap bottle.  DONE!!

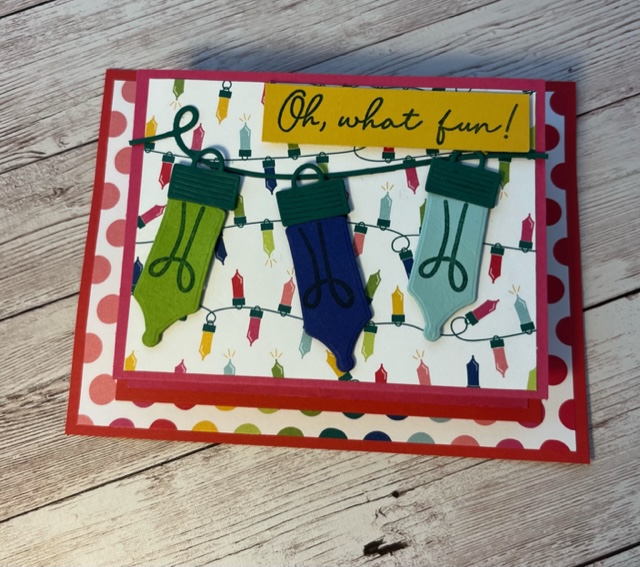
I was inspired for the ENVELOPE CARD by several stampers I found on PINTEREST and wanted to give it a try myself.  Start with an envelope, seal it and cut the short end open.  Create the panel for the inside of the card first.  

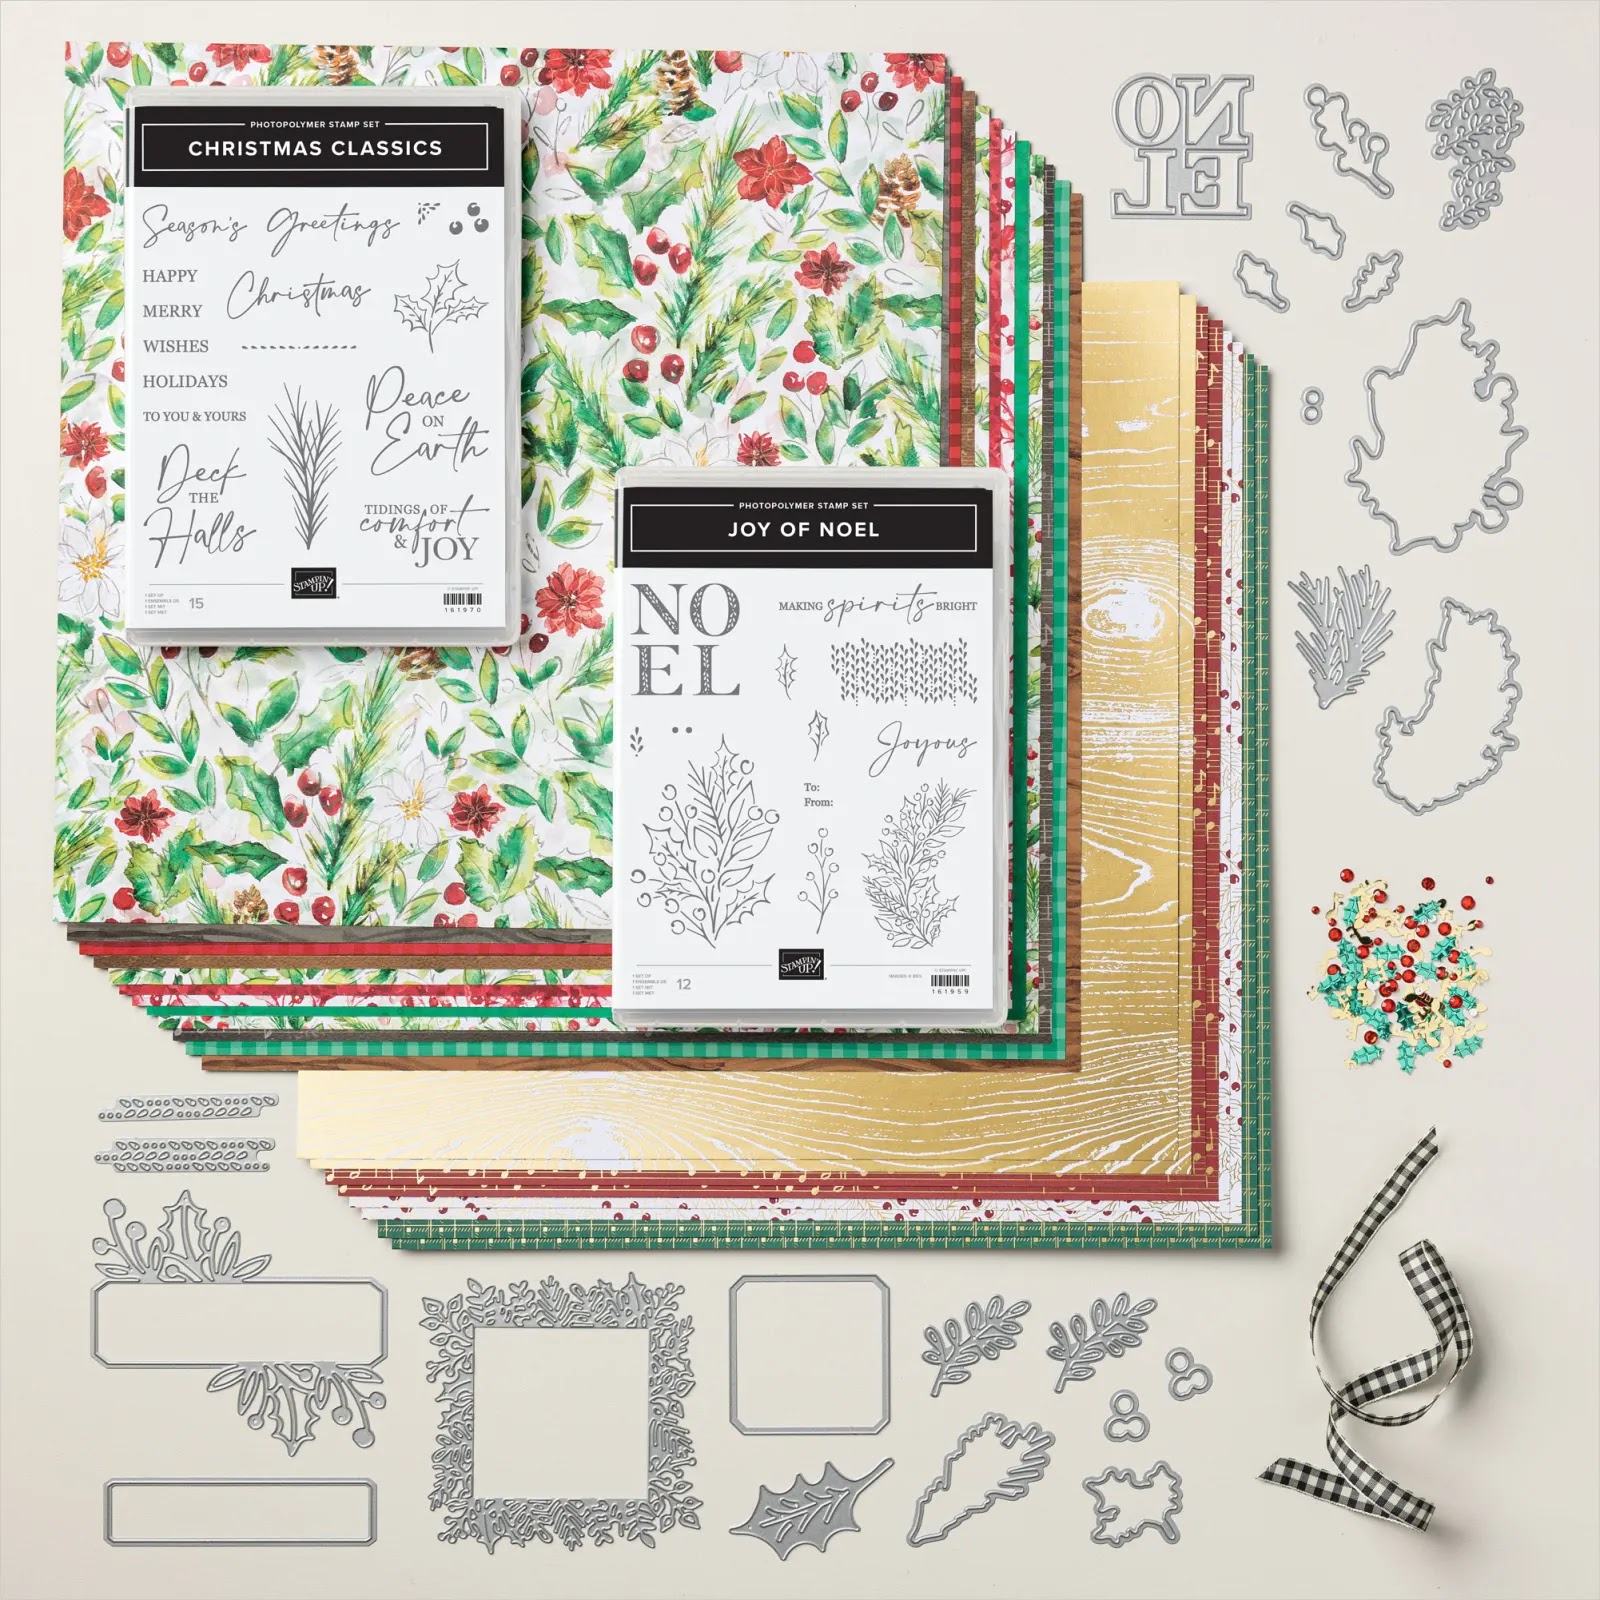
Cut a CHERRY COBBLER panel measuring 5-1/2in by 4-1/4in  Layer on that a BASIC WHITE panel measuring 5-1/4in by 4in.  Create a tab at the top by folding a strip of CHERRY COBBLER measuring 2in by 1in in half and stapling or gluing it at the top of the large panel.  Using the CLASSIC CHRISTMAS STAMP SET and the JOY OF NOEL STAMP SET, I stamped a holly branch image and the "Season's Greetings" sentiment with CHERRY COBBLER INK.

Slide the panel inside the envelope.  Cut a panel of CHERRY COBBLER measuring 4-1/4in by 10in and a panel of DSP at 4in by 10in.  Layer these panels the lay them face down on the work surface.  Center the envelope on the panel and using a BONE FOLDER, score on each side of the envelope.  Fold the panel around the envelope, overlap the ends and adhere.

For the embellishment on the front of the envelope, die cut a 2-5/8in CHERRY COBBLER circle.  Stamp the larger holly branch image in VERSAMARK INK on a scrap of BASIC WHITE card stock.  Emboss using GOLD EMBOSSING POWDER and color in the berries using CHERRY COBBLER BLENDS.  Cut the branch out using the coordinating die.  Add to the circle using DIMENSIONALS.  

Lastly, stamp the "Making Spirits Bright" sentiment on a scrap of BASIC WHITE card stock using CHERRY COBBLER INK.  To give the sentiment a smaller profile, fussy cut around the words.  Adhere to the branch.  Add the circle to the envelope using TOMBOW.  Tie a bow using the GOLD METALLIC TRIM and add it to the card front using MINI GLUE DOTS.

To see how this wonderful gift comes together, click on the YOUTUBE video below.


All the products used to make these projects are available in my online store.  Click below.

Thanks for stopping by as always.  I do appreciate all you crafters.  I hope you feel inspired to try some crafting on your own.  The holidays are coming and it's a great time to try.

Keep Stampin',

Barb Reed

The Wexford Stamper


Monday, October 16, 2023

MONDAY FUN DAY with The Wexford Stamper- Let's make some quick cards using scraps and Stampin Up Adhesive Sheets


Happy Monday Stampers!!! I have some fun projects for you today.  I've been cutting and prepping for my latest subscription card kits and I have a ton of scraps lying around.  This month, the kit used the JOY OF CHRISTMAS SUITE and scraps are from the amazing JOY OF CHRISTMAS DSP PACK.


The secret ingredient for these cards are the STAMPIN' UP ADHESIVE SHEETS.  They make the panels on the front of the cards so easy to make.


Before creating the projects, I put together all the front panels.  I start with a piece of card stock cut at 4in by 2-3/4in.  It really didn't matter what color the panel is, the scrap strips will cover it.  Next cut a similar size panel of an ADHESIVE SHEET.  Separate the layers and adhere the "sticky side" of the sheet on to the card stock panel.  Then peel off the backing, leaving the adhesive on the card stock.

Cut a number of 1/2in strips from the scraps of DSP.  For my projects, I created three different designs but the sky's the limit.  After placing the strips, cut away the excess DSP and layer it on a coordinating piece of card stock measuring 4-1/4in by 3in.


Once you finish the panels, you're almost done.  Choose another coordinating color card stock measuring 5-1/2in by 8-1/4in, scored at 4-1/4in for the card base.  Layer the panel in the center of the card front.

For the sentiment piece, use what you have.  I used punches I had in my stash, the 2in CIRCLE PUNCH and SCALLOP and the HANDMADE TAG.  For the sentiments, I used the BRIGHTEST GLOW STAMP SET.  This is a great set to have on hand for all your Christmas cards and projects.


To finish up the sentiment pieces, I added some greenery from the JOY OF NOEL DIES.  So quick and simple.  I just love this design.

If you know me well enough, you know that every post has to include a fun 3D project.  I used one of the panels created for the cards to make a cute little clam shell box.

Start with a piece of REAL RED card stock, measuring 7-1/4in by 11in.  On the SHORT side, score at 1in from both ends.  On the LONG side, score at 1in, 5in, 6in and 10in.  Fold and crease on all the score lines.  Cut on the score lines to create the six box tabs.  Apply TOMBOW to the tabs and fold the box together.  Add the scrap panel to the center of the box lid.  

Using a 3/4in BASIC WHITE card stock strip, stamp the sentiment using SHADED SPRUCE ink.  Attach to the box using DIMENSIONALS.

The video below shows how the card and box came together.  Just click.


All products used for these projects are available in my online store.  Just click below.

Thank you again for stopping by for my MONDAY FUN DAY projects.  Come back soon to see lots more holiday projects.  I hope I can inspire you to make something yourself.  

Keep Stampin'

Barb Reed
The Wexford Stamper