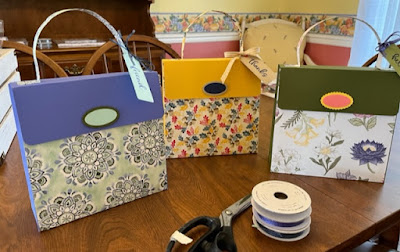
With SALE A BRATION coming to an end, many of us have accumulated a lot of FREE 12 by 12 Designer Series Paper. Our project today uses the beautiful WONDERFUL WORLD DESIGNER SERIES PAPER from the Sale A Bration brochure. These are some of the most beautiful floral images I've ever seen on paper. The paper is part of an amazing bundle available FREE for an order of $100.
This hand bag is HUUUUUGE! It is 8 inches tall, 8 inches in length and 3 inches wide. This is a great bag and can hold so much.
For the body of the bag, cut two pieces of the DSP, one at 8in by 8in and one at 8in by 11-1/2in. On the larger piece, score on the LONG side at 8in and 11in. Be sure to orient the paper so the top of the bag is to the left on the scoring board. Crease on all the score lines and adhere the two panels together using TOMBOW along the 1/2in strip on the DSP.
For the pleated sides of the bag, choose a coordinating color of card stock. You will need two panels, each scored at 1/2in and 3-1/2in of the SHORT side and at 8in on one LONG side. Return to the SHORT side and create a partial score at 2in down to the 6in mark. Use a ruler to create a score line from the end of that partial score to the two corners of that panel. Crease the score lines along the 1/2in borders of the panels. Gently crease the inside scores that create the pleat in the opposite direction. Carefully cut off the bottom corners of both panels just outside the score lines. Using TOMBOW, adhere these pleated panels to each side of the large DSP panel. It will resemble a box. Squeeze top opening gently to accentuate the pleats.
For the lid of the bag use a piece of the same card stock cut at 6-1/2in by just under 8in. This makes it easier to slide the lid inside the bag when assembling. Score on the SHORT side at 2in and 3-1/2in. Crease this panel. Round the corners at the end of the widest panel. Spread adhesive on the back side of the panel on the other end, slide it inside the back of the handbag until the fold lines up with the top edge. To make the embellishment on the front of the handbag, use the DOUBLE OVAL PUNCH. Choose two coordinating colors of cardstock to create this element. Adhere a craft magnet to the bag lid before placing with DIMENSIONALS. Place the other magnet to the bag front using a GLUE DOT. Glue a 1in circle in coordinating card stock over the magnet to hide it.
Lastly, for the handle, cut a strip of the DSP at 12in by 2in. Score on the short side at 3/4in and 1-1/2in. Crease the scores and adhere them down using TOMBOW. Place the handle on the scoring board and score at 1in from each end. Fold this scores, round the strap using a BONE FOLDER, apply TOMBOW to the ends and adhere to the top of the bag.
For the tag, I used the TAILOR MADE TAGS DIES and the BIGGEST WISH STAMP SET. The video below shows how the hand bag comes together.
If you'd like a downloadable PDF tutorial of this project, click below.
All the products used for this project can be found in my online store. Just click below
Hope you give this adorable bag a try. Remember, you can use any 12 by 12 paper you have in your stash. My next post starts my TEN DAYS OF HALLOWEEN SERIES. I will be sharing ten projects perfect for those trick or treaters. Hope you are inspired to get creative.
Keep Stamping,
Barb Reed
The Wexford Stamper


No comments:
Post a Comment