Showing posts with label Connie's Mini Catalog Launch Event. Show all posts

Monday, September 11, 2023

MERRY BOLD & BRIGHT SUITE- PROJECTS FROM CONNIE'S MINI CATALOG LAUNCH EVENT- 3D PROJECTS


On this blog post, I'm going to share the 3D projects I created for Connie's Mini Catalog launch.  If you know me you know I love to make boxes so I came up with quite a few. The first is a hand lotion gift box.  I typically use hand lotion from BATH & BODYWORKS. This box design is from a past project by Erica Cerwin of Pink Buckaroo Designs.  In the past, I've made a basic box to hold the hand cream tubes but this one is really a step up.


To create the box, cut three pieces of BLUEBERRY BUSHEL card stock.  For the body of the box, cut the panel at 2in by 10-1/2in. Score at 4-3/4in and 5-3/4in.  For the flap, cut at 2in by 3-5/8in.  Score on the LONG end at 1/2in and 1-1/2in. For the inside piece cut at 3-1/2in by 6in and score at 1in on all sides.

To create the exterior, adhere the flap at the top of the outside panel so it fold over to create the box.  The remaining panel will create the inside of the box where the lotion tube fits.  Before assembling it, punch a hole in either short end using the 3/4in CIRCLE PUNCH.  Cut out the tabs and assemble.  Remove the lid of the tube, put through the hole and replace the lid.  Adhere this interior piece on the inside of the exterior piece.

Before placing the DSP on the outside of the box add a magnet to the large folded panel using a MINI GLUE DOT.  Adhere a 1-7/8in by 4-1/2in piece of DSP.  Add a coordinating piece of DSP measuring 1-7/8in by 2in after placing the second magnet on the flap.  Add two assembled Christmas bulbs and IRIDESCENT RIBBON on the flap as shown.  Add sentiment at the bottom right of the box.

This next project uses these adorable tins that I purchased from Amazon.  Here's the link to this product.


For the belly band I cut a piece of DSP at 2-1/2in by 8-1/2in, wrapped it around the tin and secured it using TEAR N TAPE. For the embellishment, I punched out a 2in circle using BASIC WHITE card stock and a coordinating scallop using GRANNY APPLE GREEN card stock.  Add to the center of the front on belly band.  Add two lights using GRANNY APPLE GREEN and POPPY PARADE cards stock with BASIC BLACK SOCKETS.  Add to the front of the box as shown.  Tie a IRIDESCENT RIBBON bow and attach using MINI GLUE DOTS.  Stamp the sentiment on a 5/8in BASIC WHITE strip, flag the right end and add to the front as shown using TOMBOW.  

You can put lots of different things in this box. I wrapped five Hershey Nuggets and a lip balm with coordinating DSP and placed them inside. The next project is a mini gift bag.


Cut a 6in by 6in piece of DSP. Score on the FIRST side at 2in, 2-3/4in, 4-3/4in, 5-1/2in. Score on the other side at 3/4in, 4-1/2in. With the outside facing up, fold over the large panel to create the top of the bag.  Cut apart the tabs on the bottom and assemble the bag.  Tie the bag closed using the IRIDESCENT RIBBON.  Add your embellishments.  I stamped a POOL PARTY bulb on BASIC WHITE card stock and cut it out using the coordinating die.  I also cut out a BASIC BLACK socket die cut.  I then stamped MERRY & BRIGHT on BASIC WHITE card stock, fussy cut it and attached it to the bag as shown. 

The next gift box holds an Andes Creme De Menthe SNAP BAR, available at most grocery stores.


Start with a piece of GRANNY APPLE card stock cut at 9-1/4in by 5-1/4in.  Score on the LONG side at 3/4in, 1-1/2in and 8-1/2in.  On the SHORT side, score at 1/2in, 1-1/4in, 2-3/8in, and 4-1/8in.  Cut away excess card stock to close the bottom of the box and  create the flap on the top.  Add a piece of DSP measuring 7/8in by 6-1/4in to the front of the box.  

To create the embellishment, punch out a 2in BASIC WHITE circle and a GRANNY APPLE GREEN coordinating scallop.  Layer them together and stamp your sentiment in SHADED SPRUCE ink in the center-right of the circle.  Add a MELON MAMBO FOIL light bulb with a BASIC BLACK socket to the left side using DIMENSIONALS. Punch a hole in the top of the tag, thread through the IRIDESCENT RIBBON and tie it to the gift box.  Finish off with some IRIDESCENT SELF-ADHESIVE DISCS.

The next two projects are treat holders for FERRERO ROCHER CHOCOLATES, a great treat to gift for the holidays.  The first is a cute little carrier that I discovered on the PAPER PIXIE' S blog.  Click the link below to see here tutorial.


This treat holder is a cute EXPLOSION BOX I created to hold one Ferrero Rocher chocolate treat.


For the box, I cut a piece of POPPY PARADE card stock cut at 4-1/2in by 4-1/2in. Score at 1-1/2in on all four sides.  Add four more score lines starting at the outer most corners to the inner corner of the corner squares.  Crease and score those score lines to create the explosion box.  On the box, add four squares of DSP measuring 1-1/4in by 1-1/4in to cover the box panels.  For the lid, start with a piece of GRANNY APPLE GREEN card stock measuring 2-5/8in by 2-5/8in. Score at 1/2in on all four sides.  Cut away excess card stock to create the flaps and assemble the box lid.  Add a coordinating piece of DSP measuring 1-1/2in by 1-1/2in to the lid.   

For the embellishment, cut out a GRANNY APPLE GREEN FOIL light die cut and attach a SHADED SPRUCE card stock socket.  Tie a piece of IRIDESCENT RIBBON to the loop on the socket and add to the box using DIMENSIONALS. To allow more of the light to show, I stamped the sentiment on BASIC WHITE card stock and fussy cut around it before attaching to the box with TOMBOW.

My last two projects focus on gift giving with a great gift box and some cute gift tags. 


For the gift box, I used a 12in by 12in piece of cardboard from the DSP packaging. measuring 9-7/8in by 9-7/8in and scored at 2in on all four sides.  Fold and crease on the score lines. Cut away the excess card stock to create the four flaps for the box  Using TOMBOW, assemble the box.  

For the lid, cut a piece of SHADED SPRUCE card stock at 8in by 8in and score at 1in on all four sides.  Add a piece of DSP cut at 5-3/4in by 5-3/4in on the large middle panel.  Create the 3D Christmas lights by cutting two light bulb dies in each color. Cut of the bottom off one of the dies and score it down the center long wise.  Fold and adhere to the other die along the fold.  Add the SHADED SPRUCE sockets.  To add to the box, string them along a piece of IRIDESCENT RIBBON and tie a bow.

The last project is a quick way to create gift tags for the holidays.  The trick is how you die cut the bulbs.  Fold over a scrap piece of card stock.  Position the edge of the die so it is slightly off the paper on the fold side.  After you run it through the CUT & EMBOSS MACHINE, they will look like those in the pictures above. Add a socket and a piece of BAKER'S TWINE.

There you have it.  I hope my MERRY BOLD & BRIGHT projects inspire you to get started on your holiday projects.  If you have any questions about any of the projects, please email me at blreed@comcast.net.

Keep Stampin

Barb Reed
The Wexford Stamper


Sunday, September 10, 2023

MERRY BOLD & BRIGHT SUITE- PROJECTS FROM CONNIE'S MINI CATALOG LAUNCH EVENT- FUN FOLD CARDS


This time on the Stampin' Up calendar is always an exciting time for demonstrators.  The launch of the "holiday" catalog allows everyone to look forward and plan amazing cards and projects. Personally, I've had a busy year.  My family moved to South Carolina from Pennsylvania and it was quite an undertaking.  So glad to be here and ready to start my holiday creating.

I had the privilege to participate in my friend Connie Heisey's holiday mini catalog launch event as a demonstrator.  I chose the MERRY BOLD & BRIGHT SUITE.  When I first saw it in the catalog, I thought it was a bit out of my wheel house, being more modern than my more traditional taste.  I decided to purchase the suite and get a look at all the products.  Well I was SOLD!!!  This suite is amazing.  So many fun and bright possibilities for the holidays.


The MERRY BOLD & BRIGHT BUNDLE includes the MERRY & BRIGHT STAMP SET.  Its a 19-piece photopolymer set with adorable Christmas light images and perky sentiments.  The MERRY & BRIGHT DIES include dies to cut out the images as well as some adorable strings of lights.


The paper is the show stopper for this suite.  The MERRY BOLD & BRIGHT Designer Series Paper surely lives up to it's name with a bright color palate, Christmas designs and coordinating sheets.  The suite also includes a pack of MELON MAMBO & GRANNY APPLE GREEN FOILS SHEETS which are perfect to create sparkling Christmas lights.


The suite also offers some beautiful ribbon and embellishments.  The WHITE IRIDESCENT RIBBON and the IRIDESCENT ADHESIVE-BACKED DISCS are a perfect way to add finishing touches to your creations. 


For the card projects, I created all fun fold cards to match the whimsical nature of the suite. The first is the OH WHAT FUN!! card.

Start with a piece of GRANNY APPLE GREAT card stock cut at 5-1/2in by 8-1/2in for the card front. On the LONG side, score at 2-1/8in and 4-1/4in.  Fold the panel in half, then fold back on the 2-1/8in score line.  On the inside of the card, adhere a 4in by 5-1/4in BASIC WHITE panel for the message.  Add a 3/4in by 5-1/4in strip of coordinating DSP along the right edge of that panel.  On the panel that was folded back attach another piece of DSP measuring 1-7/8in by 5-1/4in.

For the center panel, cut out two Christmas bulbs using the MELON MAMBO & GRANNY APPLE GREEN FOIL SHEETS.  Use the socket dies AND SHADED SPRUCE card stock to create the ends of the lights.  Layer a GRANNY APPLE GREEN card stock panel measuring 3in by 3in together with a panel of BASIC WHITE card stock measuring 2-3/4in by 2-3/4in.  Stamp the sentiment in MELON MAMBO INK and adhere to the center of the card front with DIMENSIONALS on the half of the square panel attaching to the small front panel covered with DSP.

To add the Christmas lights, thread a piece of the IRIDESCENT RIBBON through the loops of the light bulbs, tie off and cut the ends.  Add to the front of the card using DIMENSIONALS.

The second FUN FOLD is a unique gift card holder design.  


Start with a POPPY PARADE card base cut at 4-1/4in by 5-1/2in.  Layer a piece of  coordinating DSP measuring 4in by 5-1/4in on top of the card base. 

For the “fold out” piece, use a piece of MELON MAMBO cut at 9-3/4in by 4-1/4in and scored at 3-1/4in and 6-1/2in.  Adhere the back panel of the “fold out” to a POPPY PARADE card panel cut at 3-1/8in by 4in.  Then adhere the entire “fold out” portion to the card base. 

For the panels on the “fold out” section, cut two DSP pieces and a BASIC WHITE piece at 3-1/2in by 4-1/2in.  Pocket panel for the lower panel is a piece of DSP cut at 3-1/8in by 2in.   . 

To embellish the card, die cut three Christmas bulbs using GRANNY APPLE GREEN, BLUEBERRY BUSHEL and POOL PARTY card stock.  Using BLUEBERRY BUSHEL INK, stamp the filament stamp on each bulb.  Die cut three bulb sockets and a light string using SHADED SPRUCE card stock.  Adhere the string across the top of the panel using TOMBOW and add the three lights using DIMENSIONALS.  Stamp the sentiment on a 5/8in CRUSHED CURRY strip using SHADED SPRUCE ink.  Add to the card with DIMENSIONALS.

Stamp the inside sentiment on the center section and add the small strip of DSP on the bottom to create a pocket. Place TEAR N TAPE on the bottom and sides of the strip, attach to the bottom of the panel and slide in the gift card.

The next FUN FOLD is an easel card design.  It's construction is very similar to the previous card.


Start with a piece of POPPY PARADE card stock cut at 5-1/2in by 4-1/4in for the card base.  Score at 2-1/8in and 4-1/4in. Crease and fold on the score lines, hold the card in the landscape position and attach two coordinating DSP panels measuring 1-7/8in by 5-1/4in.  This card front with use the mountain fold to create the easel.  

Next, for the inside of the card, cut two panels at 5-1/4in by 2in. One using coordinating DSP, one using BASIC WHITE card stock.  Adhere them to the inside of the card base.  

For the decorated panel on the front, cut a piece of POPPY PARADE card stock at 4-1/2in by 3-1/4in.  Layer a piece of coordinating DSP measuring 4-1/4in by 3in. Die cut using BASIC BLACK card stock, a light string and three light sockets.  Cut out three light bulbs using the FOIL SPECIALTY PAPER.  Add to the panel as shown. Adhere to the bottom section of the folded card front using TOMBOW.

To create the easel stand, cut a 1in by 3-1/2in piece of BASIC WHITE card stock. Stamp sentiment on the panel if desired.  Add it to the top of the bottom DSP panel using DIMENSIONALS.

This FUN FOLD design is called a JOY FOLD.  The card gives the recipient a big hug when they receive it.  


Start with a piece of  POOL PARTY measuring 7-1/2in by 5-1/2in and scored at 4-1/4in on the LONG side. Also cut a piece of BASIC WHITE card stock measuring 4in by 5-1/4in for the inside.  To create the hug flap, cut a piece of SHADED SPRUCE card stock measuring 2-1/2in by 4-1/2in and scored on the LONG side at 1/2in.  Crease and fold on the score line, apply TOMBOW to the 1/2 in panel, adhere it to the middle edge of the BASIC WHITE panel and then the entire piece to the inside of the card.

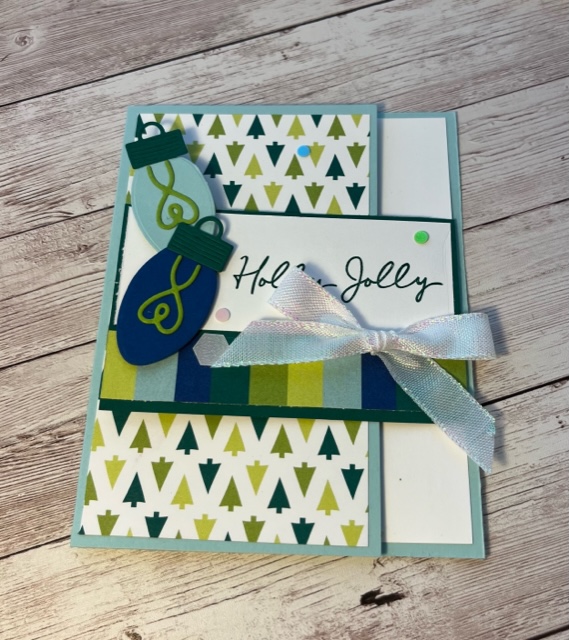
To create the card front, add a 3in by 5-1/4in piece of coordinating DSP. Fold the hug flap over and add a 3/4in by 4in piece of DSP along the bottom and a 1-1/2in by 3-3/4in panel of BASIC WHITE.  Add the sentiment, stamped in SHADED SPRUCE and add two die cut Christmas bulbs made with SHADED SPRUCE, BLUEBERRY BUSHEL, POOL PARTY and GRANNY APPLE GREEN card stock. Finish the card with an IRIDESCENT RIBBON BOW and a few IRIDESCENT ADHESIVE-BACKED DISCS.

My final card is a SLIM LINE CARD.  This design comes together quick and easy.


Start with a piece of BASIC BLACK card stock measuring 8-1/2in by 7in.  Score at 3-1/2in on the SHORT side.  Cut out four MELON MAMBO and three GRANNY APPLE GREEN light die cuts using the FOIL SHEETS.  Cut out two light strings and seven bulb sockets using SHADED SPRUCE card stock.  Add the strings to the card front using TOMBOW as shown.  Adhere the light bulb pieces to the socket pieces and add to the card front using DIMENSIONALS.  

For the sentiment, cut a 5/8in strip of BASIC WHITE card stock, stamp the sentiment using GRANNY APPLE GREEN ink and add to the card front using DIMENSIONALS.  Add a BASIC WHITE card stock panel measuring 3-1/4in by 8-1/4in for the insert.

I also created several 3D projects for the event.  They are pictured with instruction in the next blog post.

Happy Stampin

Barb Reed
The Wexford Stamper