HAPPY MEMORIAL DAY STAMPERS!! I'm writing this blog post on Monday morning, taking time to think about and honor those brave men and women who gave their lives so we can live in a free country. My dad was an army medic and was so proud of the time he served.
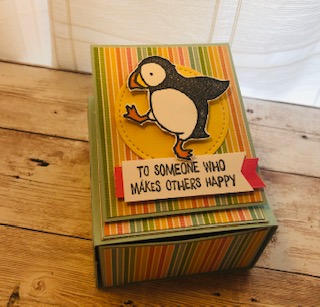
For my project this week, I picked one of the cutest stamp sets in the new catalog. PARTY PUFFINS is a cling stamp set with adorable puffin images and great party sentiments.
I got my inspiration from Angie at CHIC N SCRATCH. She made a cute little box with a pull out drawer. I added the easel card feature to the top to make the box extra amazing.
The Designer Series Paper I used for the box is called PATTERN PARTY. It's a Hostess Rewards selection. You get 48 pieces of 12 by 12 paper for only $18. The patterns are so versatile and can be used for any occasion.
Let's make the treat box and drawer portion first. Start with a piece of POOL PARTY card stock cut at 5-5/8in by 6in. Score at 1-1/2in on all four sides. Crease the score lines and using a PAPER SNIPS, cut out and angle in the corners of the four flaps. Adhere to form the basic box. Adhere a piece of the designer series paper cut at 2-1/2in by 1-3/8in on the front side. This will be the drawer that slides in to the next piece.
Using another piece of POOL PARTY card stock cut at 3-1/8in by 9-1/2in and scored on the LONG SIDE at 1in, 3-3/4in, 5-1/4in and 8in. Crease on the score lines, put adhesive on the 1in panel and adhere it together. Then adhere two pieces of the DSP cut at 1-1/4in by 2-7/8in to the sides of the sleeve. Slide the drawer inside.
Next we will be assembling the easel section. You will need a strip of POOL PARTY card stock cut at 2-1/2in by 9in, scored on the LONG side at 3in, 4-1/2in, 6in. Before adhering to the box, put two pieces on DSP on the large panels measuring 2-3/8in by 2-7/8in.
Connect the easel section to the box by adhering one of the large panels to the top of the box. Be sure to center it. Extend the easel and put adhesive on the back side of the second small panel. Close the easel on top of the box and that panel will adhere to the bottom part of the last large panel forming the easel.
Now it's time to embellish. Adhere a 2in circle of SO SAFFRON card stock to the top panel. Stamp the puffin image on a scrap piece of BASIC WHITE card stock and color the beak using PUMPKIN PIE and MANGO MELODY BLENDS. Fussy cut the image and adhere it to the center of the circle using DIMENSIONALS. Stamp your sentiment on a 5/8in strip of BASIC WHITE and flag the end. Cut a 1/2in strip of POLISHED PINK, flag one end and adhere it to the back side of the sentiment strip. Adhere it to the bottom of the panel using DIMENSIONALS.
To make the stopper, stamp the sentiment on a scrap of BASIC WHITE card stock and punch it out with a 1in CIRCLE PUNCH. Stamp the fish image, color it with PUMPKIN PIE and REAL RED BLENDS, fussy cut it and adhere it to the circle. Then take that circle and adhere it using DIMENSIONALS to the panel attached to the box in a position that props up the embellished panel.
Here is a picture of the project with the easel in the closed position.
The video below shows how the project came together.
I've also included a PDF TUTORIAL you can print and use at your convenience. Click the link below.
I hope you are inspired by this fun puffin project. If you have any questions about this or any other projects, you can email me at blreed@comcast.net. Come back next week for another cute puffin project. Don't forget to leave your email to get a notification every time I post. Stay creative. Keep stamping.
Barb Reed
The Wexford Stamper


No comments:
Post a Comment