Showing posts with label 3-D project. Show all posts

Wednesday, August 2, 2023

Mini Bundt Cake Treat Box featuring the FRESH AS A DAISY SUITE


The FRESH AS A DAISY SUITE has been such fun to create with.  It's such a great summer suite with so many beautiful possibilities.


You know how much I love my 3-D projects, so I thought I'd finish my DAISY CRAZY SERIES with this cute little treat box.  It holds one of my favorite treats, a HOSTESS MINI BUNDT CAKE.  They have a few flavors but my favorite by far is the lemon cake.  Instead of a cute little 3in by 3in card like I've made in past projects, I decided to add the sentiment right to the inside of the box.  So cute.


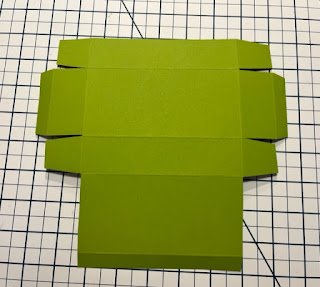
To create the box, start with a piece of PRETTY PEACOCK card stock cut at 9in by 6-3/4in.  On the LONG side, score at 1/2in, 3-1/4in, 4-3/4in and 7-1/2in.  On the SHORT side, score at 1/2in, 2in, 4-3/4in and 6-1/4in.  After cutting away the excess cardstock, your box should look like the picture below.

Before assembling, attach the coordinating DSP panels.  You will need one 2-1/2in by 2-1/2in piece and four 1-1/4in by 2-1/2in.  Cover each side except the bottom.  Place TOMBOW LIQUID GLUE on the four tabs and assemble the box.

For the embellishments on the top of the box, stamp the large daisy image on a scrap of BASIC WHITE card stock using MEMENTO BLACK INK. Then using CRUSHED CURRY INK, stamp the flower center image. Cut the daisy out using the coordinating die. Using the largest die, cut out a pair of leaves using PRETTY PEACOCK card stock.  For the sentiment, cut a strip of LEMON LOLLY card stock at 3/4in by 2in.  Stamp the sentiment using PRETTY PEACOCK INK and flag the right end.

To assemble, place the large daisy on the top left corner of the box using DIMENSIONALS.  Place some TOMBOW on the back of the leaves and slide them behind the flower.  Press to secure. Last, add the sentiment banner at the bottom left with DIMENSIONALS.

If you want to put the message panel on the inside, cut a BASIC WHITE panel at 2-1/2in by 2-1/2in.  Add a smaller daisy image to the bottom left corner using PRETTY PEACOCK INK and the small center image using CRUSHED CURRY INK.  Then add the birthday sentiment in the center using PRETTY PEACOCK INK.  Adhere to the inside of the flap using TOMBOW.

To see how the treat box comes together, click on the video below.


To download a PDF tutorial sheet, click here.

PDF TUTORIAL PAGE

All the products used for this project can be purchased in my online store. Click on the link below.

The Wexford Stamper's Online Store

Thank you for stopping by my blog. Next week I will begin a BACK TO SCHOOL SERIES.  Can't believe it's almost time for school to start again.  Here in South Carolina, they are starting August 2nd.  Have a great week.  I hope I inspired you to create something beautiful.

Keep Stampin',


Barb Reed

The Wexford Stamper


Tuesday, March 29, 2022

CREATE A CUTE MINI GIFT BAG USING THE HELLO LADYBUG BUNDLE


My love for the LADYBUG BUNDLE has no bounds.  I had so much fun creating projects using this bundle and I'm excited about my latest mini gift bag.  It's a perfect size for some Easter goodies. Here is what the bundle includes:


Start with a piece of DSP cut at 4-1/2in by 9-1/2in.  For the sample above, I used paper from the HEART & HOME Designer Series Paper pack and for the video tutorial I used a piece from the HAND PENNED DSP.  Anything in your stash that is a floral will be perfect for this project.  Starting on the SHORT SIDE, score at 1-1/2in.  

Turn your paper so that the score line you just made is close to the top of your scoring board.  Then on the LONG SIDE, score JUST TO THE SCORE LINE, at 1-1/2in, 4-1/2in, 6in, then across the entire with of the paper at 9in.  Fold on the score lines and snip all the short score lines up to the horizontal score line to create the tabs for the bottom of the gift bag.  

Place TEAR N TAPE on the thin vertical panel and adhere it to the other side of the panel.  Then using TOMBOW fold up and adhere the rectangular and square tabs to create the bottom.  Cut two strips of coordinating card stock at 5-1/2in by 1/2in for the handles and adhere them to the top of the bag as shown using TEAR N TAPE.  

For the flower, punch eight petals using the LADYBUG PUNCH.  Choose a card stock color that coordinates with your DSP.  Place one of the CRUMB CAKE 1-3/8in CIRCLES in front of you and start creating the flower by adhering petals in a circle, overlapping as you go.  I used GLUE DOTS so I could move the petals around to get the best result.  Once you have finished arranging the petals, place the second CRUMB CAKE circle on top for the center.

Next, using the LADYBUG PUNCH, punch out a ladybug body using BASIC BLACK card stock.  On a piece of BASIC WHITE card stock, stamp the wings using a coordinating ink color and punch them out.  Adhere the wings to the body using DIMENSIONALS then to the bag using DIMENSIONALS.  

The link below is a video tutorial that shows how the project comes together.


Click the link below for a downloadable PDF tutorial


All the products used in this project are available in my online store.  Click below and get shopping.


Thanks for stopping by my blog.  I hope you feel inspired to be creative yourself.  Come back soon for some more great project ideas.

Keep Stamping,

Barb Reed
The Wexford Stamper


Tuesday, February 1, 2022

VALENTINE'S DAY TREAT HOLDER SERIES #5- VALENTINE DOOR HANGER TREAT HOLDER


I'm writing this blog post on the last day of January so Valentine's Day is just two weeks away.  This treat holder project is a great last minute idea because you can use it for any sweet treat of your choice. I've made this project in the past for Halloween but it can be made for any and all holidays.  Who doesn't love surprising a friend or family member with a fun treat hanging on their front or office door?

As with the other four projects, I will be using the SWEET TALK SUITE, a cute suite that brings back memories of those delicious Conversation Hearts we loved and gobbled as a child.  My favorite part of the SWEET CONVERSATIONS BUNDLE  is the adorable tag and the mini envelope.


BUT the star of the show is the beautifully colorful paper, SWEET TALK DESIGNER SERIES PAPER.


To create the hanger, start with a BLUSHING BRIDE card stock cut at 8-1/2in by 10-1/2in.  On the LONG side, score at 1/2in, 2-1/2in, 5-1/2in and 7-1/2in.  On the SHORT side, score at 2in.  Continue scoring on this side at 5in, scoring only to the second horizontal score line.  Rotate the paper 180 degrees and score at the 3-1/2in to the second horizontal score line.  After cutting away the excess card stock, your project should look like the template below.


Before assembling the door hanger, adhere four panels of DSP; two cut at 1-3/4in by 2-3/4in and one each at 2-3/4in by 6-1/4in and 2-3/4in by 2-3/4in. On the longest panel, cut a hole about 1/2 in from the top using the 2IN CIRCLE PUNCH.  To create the scalloped edge on the opening, take a 3in by 3in piece of BLUSHING BRIDE card stock and cut a 2in circle out of the middle.  Then, using a scalloped circle from the LAYERING CIRCLE DIES, cut out the scalloped edge using the CUT & EMBOSS MACHINE.  Adhere it into place using TOMBOW.  Next, using TEAR N TAPE on the 1/2in tab and the closing flap on the bottom.

Die cut a BASIC WHITE tag, stamp the heart images with BLUSHING BRIDE INK and the sentiment in MEMENTO BLACK INK as shown above.  Die cut the string of hearts using HIGHLAND HEATHER card stock and adhere it to the bottom of the box front using TOMBOW.  Adhere the tag to the front with DIMENSIONALS and the bow with a GLUE DOT.

To see how this valentine door hanger comes together, click the YOUTUBE link below.


If you would like a downloadable PDF tutorial of this project, click on the link below.


All the products used for this project are available in my online store. Just click below.


Thanks again for stopping by my blog.  I hope you enjoyed my VALENTINE TREAT HOLDER SERIES. I'm excited to share more projects using products from the new JAN-JUNE Mini Catalog as Spring approaches.  Ok.  You have two weeks.  Time to start creating those fun valentine gifts for everyone you love.

Keep Stamping,

Barb Reed
The Wexford Stamper


Tuesday, January 25, 2022

VALENTINE'S DAY TREAT HOLDER SERIES- PROJECT #4- BABY BUNDT CAKE TREAT BOX


Here in freezing cold PA, January is coming to a close.  With February just around the corner, I love creating for my VALENTINE'S DAY TREAT BOX SERIES.  For my fourth box, I used a favorite color of mine for the box.  Although GRANNY APPLE GREEN may not be a typical color choice for the box with the SWEET TALK SUITE it works and goes so well with the amazing DSP. Check out the amazing products in this suite.


The SWEET CONVERSATIONS BUNDLE has so many cute images and dies.  My favorite is the cute little hearts that channel the Conversation Heart candies from my childhood and the die that makes an adorable tiny envelope.


I just love this paper and I chose a design that had some small GRANNY APPLE GREEN hearts in it and that gave me the inspiration to create this box.  I always start my box creation with the treat in mind.  For this one, I chose a twin pack of BABY BUNDT CAKES.  I found them at my local convenience store and last year I made a similar project with a single cake and it was a fan favorite.  These cakes were a limited edition, especially for Valentine's Day.


Start with a piece of GRANNY APPLE GREEN card stock cut at 8-3/4in by 8in.  On the LONG SIDE, score at 1/2in, 1-3/4in, 7in, and 8-1/4in.  On the SHORT SIDE, score at 1/2in, 3in, 4-1/4in and 6-3/4in.  After creasing the score lines and cutting away the excess cardstock, your box should look like the template below.


Before assembling the box, adhere the DSP cut at 5-1/8in by 2-3/8in to the top flap using TOMBOW.  Place TOMBOW on all the box's small flaps and put the box together.  

To decorate the lid, adhere a 3/4in by 5-1/8in strip on REAL RED CARD STOCK to the front of the box lid.  Over this, strip adhere a BLUSHING BRIDE heart strip die cut from the coordinating dies.  The die will not reach all the way across the box.  To cover the remaining space, adhere a 2in BASIC WHITE circle with a REAL RED coordinating scallop together and place it on the box using DIMENSIONALS.

Die cut the mini envelope in BLUSHING BRIDE CARD STOCK and glue it together, leaving the top flap open.  Using the small heart dies, cut out three hearts from the coordinating DSP.  Adhere them to the envelope as shown.  Finish off the box with a cute little bow.

Check out the YOUTUBE video below to see how the box comes together.


If you'd like a downloadable PDF tutorial for this project, click the link below.


If you love the SWEET TALK SUITE, all the products are available in my online store.  Just click the link below.


Thanks as always for stopping by my blog.  Can't believe I only have one more installment of my VALENTINE'S DAY TREAT HOLDER SERIES.  Stop back and see the last Valentine post.  I hope you are inspired to make some cute 3D Valentine Treats for your favorite valentine's.

Keep Stampin,

Barb Reed
The Wexford Stamper


Tuesday, January 18, 2022

VALENTINE'S DAY TREAT BOX SERIES #3- WINDOWED TREAT BAG & LINDOR TRUFFLES


It's less than a month until Valentine's Day so I'm in construction mode here, putting together treats for friends and family.  I really feel in love with this cute little treat bag and will be making more of these.  As with my last two projects, this treat holder uses the SWEET TALK SUITE.  These products make it so easy to create beautiful gifts for your valentine.  The bundle includes the SWEET CONVERSATIONS stamp set and the SWEET HEARTS DIES.  This bundle brings back happy memories of Conversation Hearts and childhood Valentine's Day boxes made for school.


Not to be outdone, this suite's DSP takes that memory over the top with the adorable images and happy pastel color palate.


Start with a REAL RED piece of card stock cut at 10in by 7-1/2in.  Score on the LONG SIDE at 1/2in, 2-1/4in, 5-1/4in and 7in.  On the SHORT SIDE, score at 1-3/4in.  Be sure you score at the bottom of the bag here, taking into consideration the orientation of the DSP printed images.  Return to the LONG SIDE and add partial scores at 1-3/8in and 6-1/8in to the 4in mark. Crease the score lines and cut away the excess card stock.  Your bag should look like the template below.


Next, on the large panel closest to the 1/2in strip, adhere a piece of DSP measuring 2-7/8in by 5-5/8.  Fold up the bottom flap of this panel, slide in the LABEL ME LOVELY PUNCH as far as it will go and punch out the window.  You will also punch out a portion of the flap but it will be hidden when the bag is assembled.   Cut a piece of WINDOW SHEET at 2-1/2in by 2-1/2in and adhere it to the underside of the window using GLUE DOTS. Add a strip of TEAR & TAPE on the 1/2in strip and assemble the bag.  Use TOMBOW to close up the flaps on the bottom.

To hold the top of the bag together before adding the ribbon, I created a belly band of sorts using a 1in by 4-3/4in HIGHLAND HEATHER card stock strip scored at 1/2in and 3-5/8in.  Crease and fold the belly band, adhere it using the 1/2in panel and slide it onto the top of the bag.  Remember to add your truffles first.

For the tag, I cut out the tag die twice, using BASIC WHITE and BLUSHING BRIDE card stock.  On the BLUSHING BRIDE tag, place a heart image from the DSP with a DIMENSIONAL, cutting it out using the coordinating die cut. Layer the tags and thread them on to a piece of REAL RED FAUX LINEN RIBBON, wrap it around the bag on top of the belly band and tie a bow.

The YOUTUBE video below shows how the treat bag comes together.


If you'd like a downloadable PDF tutorial, click below, print it out and get started.


All the materials used in this project are available in my online store, just click below and get shopping.

Thanks again for dropping by my blog.  I hope you feel inspired to try some creating on your own.  I will be continuing my VALENTINE'S DAY TREAT HOLDER SERIES next week.  Come on back again.

Keep Stamping,

Barb Reed
The Wexford Stamper


Tuesday, December 21, 2021

Make a SHADOW BOX HERSHEY BAR TREAT HOLDER for a LAST MINUTE HOLIDAY GIFT


Christmas is less than a week away!!  We are all working on those last minute tasks, hoping to get it all done before the BIG DAY.  My project today is a quick and unique treat holder that can be put together quickly with just a stop at your local grocery or convenience store.  I used products from the PAINTED CHRISTMAS SUITE, but you can use whatever holiday paper you have in your stash.


The PAINTED CHRISTMAS SUITE includes two amazing bundles, both so beautiful for making traditional holiday projects.  But the star of this show is the stunning DSP.


1)Start with a piece of EVENING EVERGREEN card stock cut at 7-1/4in by 11in.  Score on ALL SIDES at 1/2in, 1in, 1-1/2in and 2in.  On BOTH SHORT ENDS, score at 2-1/2in and 4-3/4in to the SECOND SCORE LINE ONLY.  Do your cutting before you fold on your score lines.  Below is a template of the shadow box after cutting and before creasing the score lines.

2)Crease all the score lines and put the box together using sticky strip and TOMBOW for the corners.  Check out the video tutorial linked below to see how the box comes together. 


3)For the slide on lid, start with a piece of coordinating DSP cut at 7in by 8-1/2in.  If you have a directional paper, be sure it is in a portrait orientation.  I used a piece from the PAINTED CHRISTMAS SUITE. Place the completed box face down in the middle of the DSP and fold the paper around the box, lightly folding at each edge. Remove the box and use your bone folder to crease these lines and make sharp edges.  Wrap it around the box again and using STICKY STRIP, close the slide on lid in the back.  

4)To decorate the front of the box, I used a 2-3/8in STITCHED CIRCLE with coordinating LAYERING SCALLOP and adhered them to the left side.  I stamped a mistletoe, greenery, pinecone, and berries image on BASIC WHITE card stock and cut them out using the coordinating stamps and dies.  Adhere them on the circle with TOMBOX and DIMENSIONALS.  Finish off the circle with a silver bow from the SIMPLY ELEGANT TRIM using a GLUE DOT.

5)Finally, stamp the “MERRY CHRISTMAS” sentiment in REAL RED INK on a 3/4in BASIC WHITE card stock strip.  Cut the banner end on the left side and adhere to the box using DIMENSIONALS.

If you'd like a downloadable PDF, click below

PDF Tutorial

All of the products used for this project are available in my online store, click below and get shopping

The Wexford Stamper's Online Store

My holiday project series has come to a close.  I'm excited for the new Jan-June catalog and all the amazing products.  Come back soon to check out those projects.  Have a wonderful holiday and keep on stampin.'


Barb Reed

The Wexford Stamper


Tuesday, November 16, 2021

CREATE A COOKIE BOX FOR YOUR HOLIDAY GOODIES USING YOUR FAVORITE DSP


I always love baking during the holidays.  When sharing these goodies with others, I usually use a holiday plate covered with plastic wrap but now I've found a new way.  Inspired by SALLY STAMPER, I created this beautiful box.  I always thought that to make a box this size you would need 12 by 12 sheets of card stock but Sally came up with a great way to use 8-1/2in by 11in paper and still create a box that is 3-1/2in on all sides.

Start with cardstock that coordinates with your holiday DSP.  Cut two pieces of the cardstock at 7-1/2in by 7in for the box.  On the LONG side, score at 3-1/2in and 7in.  On the SHORT SIDE score at 3-1/2in.  With the 1/2in strip to the right, cut off the bottom portion of the strip and cut up the vertical score line to the first horizontal score line.  Apply adhesive to one of the remaining thin strips and attach both pieces together.  Fold the box up, adhere the second tab, and then the bottom of the box.  

On two opposite sides of the box adhere coordinating cardstock panels measuring 3-1/4in by 3-1/4in and a piece of DSP cut at 3-1/8in by 3-1/8in.  Next create the sleeve.  Start with two pieces of card stock cut at 7-1/2in by 3-9/16in.  On the LONG side of each, score at 3-9/16in and 7-1/8in.  To create the window, choose a shaped die, I chose a 2-1/8in square from the STITCHED SHAPES DIES. On the first panel from the tab panel, cut the shape out of one of the strips. 

Add the WINDOW SHEET panel measuring 3-1/4in by 3-1/4in behind the square opening using GLUE DOTS.  On both sides of the window apply coordinating cardstock and DSP measuring the same as those on the box.  Next, adhere them together at both tabs to form a sleeve.

The video tutorial below shows how the project comes together.


If you'd like a downloadable PDF tutorial of this project, click below.

PDF TUTORIAL

The products used for this project are available in my online store.  Click below to shop.

The Wexford Stamper's Online Store


Thank you for stopping by my blog.  I hope you feel inspired to try some creating yourself.  Come back again soon.  I'll be posting more holiday projects.


Keep Stamping,

Barb Reed

The Wexford Stamper


Tuesday, November 9, 2021

Make this quick and easy TAPERED TREAT BOX using your favorite Christmas DSP


Christmas is just around the corner and I love this project because it can be used for so many things.  It can be a gift box, holding small gifts like jewelry or makeup.  It can be a treat box, storing your favorite chocolate.  I love the idea of using it as a table favor, filling it will goodies for the guest and putting their name on the front.  This TAPERED TREAT BOX is quickly becoming one of my favorites to make and give. I love the unique shape of the box and the magnetic closure.  This box is totally a keeper.


Choose your favorite DSP and a coordinating card stock color.  Cut the cardstock at 7-1/2in by 9-3/4in.  On the LONG side, score at 2-1/4in, 4-1/2in, 6-3/4in and 8-1/4in.  On the SHORT side, score at 2-1/4in from both sides. Below is a picture of the box template after it is scored, creased and cut.


Cut four pieces of DSP at 2-1/8in by 2-7/8in (2 pieces) and 1-3/8in by 2-7/8in (2 pieces).   On the end that has the two smaller card stock panels, round the corners using the DETAILED TRIO PUNCH. 


Using a GLUE DOT, attach a magnet at the center of the panel with the rounded corners.  The link below is where I found the magnets on AMAZON.


Then take one of the smaller DSP pieces and adhere it to that panel, over the magnet using TOMBOW.  Adhere the second small piece to the adjacent panel.  On the first larger box panel, adhere one of the larger pieces.  If your paper has a required orientation, be sure to turn it upside down before adhering.

Next, to assemble the box, put glue on the four small tab and  fold the sides together.  To position the other magnet, let it attract to the first one on the underside of the flap.  Place a GLUE DOT on the unstuck side, close the box and allow the magnet to stick to the unfinished panel.  After it's positioned, adhere the last piece of DSP over that panel.

For my boxes, since I was going to put HERSHEY KISSES in mine, I found the perfect sentiment from the SWEET LITTLE STOCKINGS stamp set.  


I stamped using a coordinating ink on BASIC WHITE card stock.  The PEACE, JOY & KISSES sentiment was perfect. I used the DOUBLE OVAL PUNCH to cut out the oval, then I cut the scalloped oval in the coordinating card stock.  I layered those pieces together and placed them on the front of the box flap using DIMENSIONALS.


The link below is from my YOUTUBE channel and shows how the box comes together.


If you'd like to download a printable PDF, click on the link below.


Thank you for stopping by my blog.  I hope you are inspired to try some projects yourself.  Come back soon for some more great holiday projects.  Next week a WINDOWED COOKIE BOX.  

Keep Stamping,

Barb Reed
The Wexford Stamper


Thursday, August 19, 2021

MAKE THIS ADORABLE SUNSHINE GIFT BAG featuring the Sharing Sunshine Stamp Set and the New INCOLOR DSP


When I was a child, a friend of mine got very sick and needed at least a week, maybe more to recuperate.  When getting ready to go for a visit, my mom suggested we put together a SUNSHINE BOX.  A what????  A Sunshine Box is the gift that keeps on giving.  It contains many small gifts instead of one big gift that can be opened one at at time each day.  We even put the day of the week the gift was to be opened on the tag of each wrapped box.  I was so excited to take this to my friend because I knew it was a gift that would last a whole week.  She was so surprised to receive this unique gift that I never forgot the concept and have given different forms of a Sunshine Box for my whole adult life.  More recently, the color theme has become part of the gift so I am always will to jump on th latest trend, choosing the sunny color YELLOW for my gift bag contents. 

The SHARING SUNSHINE Stamp Set was a perfect match for this gift idea.  The cute sun image and the versatile sentiments make this a great set to have in your stash.


While browsing through PINTEREST, I noticed that there were some cards created using this set and pairing it with POLISHED PINK Designer Series Paper.  I loved the combination, so I decided to make the bag using POLISHED PINK and CRUSHED CURRY for the sun.  The paper I used was in the new INCOLOR 6X6 PAPER STACK.  I love the new INCOLORS and I get so much use out of this stack because it gives you a variety of colors that match perfectly with the coordinating cardstock and the DSP has a variety of patterns in each color.


For the base of the gift bag, I used a piece of POLISHED PINK card stock measuring 5in by 2-1/2in, scored on all four sides at 1/2in.  I then took that piece of card stock, snipped the flaps loose and created a thin rectangular box.  

I then took two sheets of the POLISHED PINK DSP cut at 6in by 4-1/2in.  These panels will form the body of the bag.  The panels go on in a landscape orientation with TEAR & TAPE applied to the bottom of each panel and the sides of the front panel.  Carefully adhere the back panel first, following along the base created with the card stock.  Do the same with the front panel, then carefully adhere the sides together.  

Cut five 1/2in by 11in strips of POLISHED PINK card stock for the binding along the top, bottom and sides of the bag.  I used TEAR & TAPE to adhere them to the bag, cut off the excess and secured the ends with TOMBOW.

For the tag on the bag, start with a piece of POLISHED PINK card stock cut at 4in by 2-1/4in, scored at 1in on the long side.  Cut out a 3/8in CRUSHED CURRY circle and stamp the sun's face image on it using MEMENTO BLACK INK and POLISHED PINK INK for the cheeks.  On a 1-7/8in BASIC WHITE circle, stamp the sun rays image in CRUSHED CURRY INK.  Attach the sun together using DIMENSIONALS and then adhere the sun to the POLISHED PINK tag using DIMENSIONALS.  Create the flag at the bottom of the tag using the TAILORED LABEL PUNCH.  Fold at the 1in score line and adhere it to the inside of the bag using TOMBOW. I added a 3/4in by 11in strip of POLISHED PINK for the handle then tied a bow on top using the beautiful WHITE GLITTERED ORGANDY RIBBON.

The video below shows how the gift bag came together.


If you are interested in a downloadable PDF, click the link below.


All the products used for this project are available for purchase at my online store.  Just click the link below and get shopping.


Thanks for stopping by my blog.  I hope you are feeling inspired to get creative yourself.  Next week I will be back at my regular Tuesday FB LIVE streaming day.  Join me live or check my blog for all the project details.

Keep on Stamping,

Barb Reed
The Wexford Stamper


Tuesday, August 10, 2021

BACK TO SCHOOL PROJECT- MONSTER BACKPACK TREAT BOX

Here in Pennsylvania, my teacher friends go back next week to start in-person school.  It is a relief to everyone that kids are back in school but they can't believe how fast the summer has gone.  I always like to make a little treat for the kids in the neighborhood for the first day of school.  I love these cute little MONSTER BACKPACKS I created.  I put a pack of fruit snacks in each one, the perfect snack for after school.


Start with a piece of CRUSHED CURRY card stock cut at 3-3/4in by 11in.  Score on the LONG side at 2in, 2-1/2in, 6-1/2in and 7in.  For the pocket on the inside for the fruit snacks, cut a piece at 5in by 4in and score on three of the sides at 1/2in and 1in. (2 long sides and 1 short side). Cut the inside piece like the template below, cut the opening of the pocket using the DOUBLE OVAL PUNCH and adhere it to the inside of the long, folded strip using TOMBOW.

For the DSP on the treat box, one piece at 3-5/8in by 1-7/8in, one piece at 3-5/8in by 3-7/8in and two pieces at 3-5/8in by 3/8in.  Place a mini magnet in the center of the top flap using a GLUE DOT.  Adhere the DSP over the magnet using TOMBOW.  You may want to round the corners of the top flap and DSP using the TRIO PUNCH.  Open the top flap and take another mini magnet and allow it to stick to the inside of the flap.  Place a GLUE DOT on the magnet and close the flap, allowing the mini magnet to adhere to the bottom flap.  Then take the corresponding piece of DSP and adhere it to the bottom flap with TOMBOW.  Adhere the two remaining DSP strips to the top and bottom of the backpack.

Cut a CRUSHED CURRY card stock strip at 3in by 3/8in and score at 1/2in from each end.  This is the loop for the dop of the backpack.  Then cut two strips at 1/2in by 5in and score at 1in from each end.  These are the shoulder straps.  Adhere them to the back of the treat box with TOMBOW.   

 For the eyes, cut out two BASIC WHITE card stock circles (smallest die) from the LAYERING CIRCLE DIES. Then punch out two CRUSHED CURRY card stock circles using the 1in CIRCLE PUNCH.  Finally cut out two BASIC BLACK circles using the 1/2in CIRCLE PUNCH.  I used a WHITE GEL PEN to create a shine in each eye.

Finally for the inside sentiment, I used the “IT’S YOUR DAY” sentiment from the UNDER MY UMBRELLA Stamp Set.  I stamped it in MEMENTO BLACK INK on a piece of BASIC WHITE CARDSTOCK cut at 3-5/8in by 3-7/8in and adhere it to the inside of the open treat box.  I used the smallest of the LAYERED STITCHED RECTANGLES, cut out of CRUSHED CURRY card stock for the patch on the front.  I stamped the “HAPPY FALL YA’LL” sentiment from the BANNER YEAR Stamp Set in MEMENTO INK

You can click on the link below to see the YouTube video that shows how the project comes together.


If you would like a PDF tutorial to download, with products and measurements, click on the link right here.

PDF TUTORIAL

Any products I used for this project are available in my online store.  Just click below and SHOP.

THE WEXFORD STAMPER'S ONLINE STORE

It's hard to believe that Fall is on it's way.  Next week I'll be sharing a fun and "sunny" card and and 3D project that would be a great HELLO GIFT for a teacher or a cheery surprise for a friend.  Come back soon to check it out.

Barb Reed

The Wexford Stamper.