Showing posts with label 2020-2021 Stampin Up Annual Catalog. Show all posts

Thursday, August 19, 2021

MAKE THIS ADORABLE SUNSHINE GIFT BAG featuring the Sharing Sunshine Stamp Set and the New INCOLOR DSP


When I was a child, a friend of mine got very sick and needed at least a week, maybe more to recuperate.  When getting ready to go for a visit, my mom suggested we put together a SUNSHINE BOX.  A what????  A Sunshine Box is the gift that keeps on giving.  It contains many small gifts instead of one big gift that can be opened one at at time each day.  We even put the day of the week the gift was to be opened on the tag of each wrapped box.  I was so excited to take this to my friend because I knew it was a gift that would last a whole week.  She was so surprised to receive this unique gift that I never forgot the concept and have given different forms of a Sunshine Box for my whole adult life.  More recently, the color theme has become part of the gift so I am always will to jump on th latest trend, choosing the sunny color YELLOW for my gift bag contents. 

The SHARING SUNSHINE Stamp Set was a perfect match for this gift idea.  The cute sun image and the versatile sentiments make this a great set to have in your stash.


While browsing through PINTEREST, I noticed that there were some cards created using this set and pairing it with POLISHED PINK Designer Series Paper.  I loved the combination, so I decided to make the bag using POLISHED PINK and CRUSHED CURRY for the sun.  The paper I used was in the new INCOLOR 6X6 PAPER STACK.  I love the new INCOLORS and I get so much use out of this stack because it gives you a variety of colors that match perfectly with the coordinating cardstock and the DSP has a variety of patterns in each color.


For the base of the gift bag, I used a piece of POLISHED PINK card stock measuring 5in by 2-1/2in, scored on all four sides at 1/2in.  I then took that piece of card stock, snipped the flaps loose and created a thin rectangular box.  

I then took two sheets of the POLISHED PINK DSP cut at 6in by 4-1/2in.  These panels will form the body of the bag.  The panels go on in a landscape orientation with TEAR & TAPE applied to the bottom of each panel and the sides of the front panel.  Carefully adhere the back panel first, following along the base created with the card stock.  Do the same with the front panel, then carefully adhere the sides together.  

Cut five 1/2in by 11in strips of POLISHED PINK card stock for the binding along the top, bottom and sides of the bag.  I used TEAR & TAPE to adhere them to the bag, cut off the excess and secured the ends with TOMBOW.

For the tag on the bag, start with a piece of POLISHED PINK card stock cut at 4in by 2-1/4in, scored at 1in on the long side.  Cut out a 3/8in CRUSHED CURRY circle and stamp the sun's face image on it using MEMENTO BLACK INK and POLISHED PINK INK for the cheeks.  On a 1-7/8in BASIC WHITE circle, stamp the sun rays image in CRUSHED CURRY INK.  Attach the sun together using DIMENSIONALS and then adhere the sun to the POLISHED PINK tag using DIMENSIONALS.  Create the flag at the bottom of the tag using the TAILORED LABEL PUNCH.  Fold at the 1in score line and adhere it to the inside of the bag using TOMBOW. I added a 3/4in by 11in strip of POLISHED PINK for the handle then tied a bow on top using the beautiful WHITE GLITTERED ORGANDY RIBBON.

The video below shows how the gift bag came together.


If you are interested in a downloadable PDF, click the link below.


All the products used for this project are available for purchase at my online store.  Just click the link below and get shopping.


Thanks for stopping by my blog.  I hope you are feeling inspired to get creative yourself.  Next week I will be back at my regular Tuesday FB LIVE streaming day.  Join me live or check my blog for all the project details.

Keep on Stamping,

Barb Reed
The Wexford Stamper



Tuesday, June 1, 2021

IT'S A PUFFIN PARTY!!! MAKE THIS ADORABLE EASEL CARD/TREAT BOX featuring the PARTY PUFFINS STAMP SET

HAPPY MEMORIAL DAY STAMPERS!!  I'm writing this blog post on Monday morning, taking time to think about and honor those brave men and women who gave their lives so we can live in a free country. My dad was an army medic and was so proud of the time he served.


For my project this week, I picked one of the cutest stamp sets in the new catalog.  PARTY PUFFINS is a cling stamp set with adorable puffin images and great party sentiments.


I got my inspiration from Angie at CHIC N SCRATCH.  She made a cute little box with a pull out drawer.  I added the easel card feature to the top to make the box extra amazing.


The Designer Series Paper I used for the box is called PATTERN PARTY.  It's a Hostess Rewards selection.  You get 48 pieces of 12 by 12 paper for only $18.  The patterns are so versatile and can be used for any occasion.


Let's make the treat box and drawer portion first.  Start with a piece of POOL PARTY card stock cut at 5-5/8in by 6in.  Score at 1-1/2in on all four sides.  Crease the score lines and using a PAPER SNIPS, cut out and angle in the corners of the four flaps.  Adhere to form the basic box.  Adhere a piece of the designer series paper cut at 2-1/2in by 1-3/8in on the front side.  This will be the drawer that slides in to the next piece.  

Using another piece of POOL PARTY card stock cut at 3-1/8in by 9-1/2in and scored on the LONG SIDE at 1in, 3-3/4in, 5-1/4in and 8in. Crease on the score lines, put adhesive on the 1in panel and adhere it together.  Then adhere two pieces of the DSP cut at 1-1/4in by 2-7/8in to the sides of the sleeve.  Slide the drawer inside.

Next we will be assembling the easel section.  You will need a strip of POOL PARTY card stock cut at 2-1/2in by 9in, scored on the LONG side at 3in, 4-1/2in, 6in. Before adhering to the box, put two pieces on DSP on the large panels measuring 2-3/8in by 2-7/8in.  

Connect the easel section to the box by adhering one of the large panels to the top of the box. Be sure to center it.  Extend the easel and put adhesive on the back side of the second small panel.  Close the easel on top of the box and that panel will adhere to the bottom part of the last large panel forming the easel.

Now it's time to embellish.  Adhere a 2in circle of SO SAFFRON card stock to the top panel.  Stamp the puffin image on a scrap piece of BASIC WHITE card stock and color the beak using PUMPKIN PIE and MANGO MELODY BLENDS. Fussy cut the image and adhere it to the center of the circle using DIMENSIONALS. Stamp your sentiment on a 5/8in strip of BASIC WHITE and flag the end.  Cut a 1/2in strip of POLISHED PINK, flag one end and adhere it to the back side of the sentiment strip. Adhere it to the bottom of the panel using DIMENSIONALS.

To make the stopper, stamp the sentiment on a scrap of BASIC WHITE card stock and punch it out with a 1in CIRCLE PUNCH.  Stamp the fish image, color it with PUMPKIN PIE and REAL RED BLENDS, fussy cut it and adhere it to the circle.  Then take that circle and adhere it using DIMENSIONALS to the panel attached to the box in a position that props up the embellished panel.  

Here is a picture of the project with the easel in the closed position.

 
The video below shows how the project came together.  


I've also included a PDF TUTORIAL you can print and use at your convenience.  Click the link below.


I hope you are inspired by this fun puffin project.  If you have any questions about this or any other projects, you can email me at blreed@comcast.net.  Come back next week for another cute puffin project.  Don't forget to leave your email to get a notification every time I post.  Stay creative.  Keep stamping.

Barb Reed
The Wexford Stamper


Tuesday, March 30, 2021

Let's Make CLEAR CARDS featuring the INBLOOM and the DANDY GARDEN SUITES

I always love to browse social media platforms for new and different ideas in card making.  My latest find is CLEAR CARDS.  What are clear cards you may ask?  They are cards who have card bases made of clear acetate.  That's it!!  It's nothing too crazy but the designs can be so beautiful. 


For the card, I used an acetate card base, use a piece of  cut at 4-1/4in by 11in folded and creased at 5-1/2in.  On the inside of the back panel of the card base, adhere a piece of DSP from the FLOWERS FOR EVERY SEASON SUITE cut at 4in by 5-1/4in. 


Next create the inside mini card element using a piece of BASIC WHITE card stock cut at 6-1/2in by 4-1/2in and scored and folded at 3-1/4in on the LONG SIDE.  Using the TRI-CORNER PUNCH, round the outside corners of the folded panel.  


Cut two coordinating designs from the paper stack, cutting one at 3in by 4-1/4in and one at 3in by 1-3/4in.  Adhere them to the front of the mini card, rounding the corresponding corners first. Adhere the mini card to the back panel DSP with the fold lined up along the left edge.

The last few elements are adhered to the front of the acetate.  On a piece of BASIC WHITE card stock cut at 2in by 2-1/4in, stamp the sentiment from the INBLOOM stamp set using MEMENTO INK.  Adhere an identical piece of cardstock on the underside of the front panel to cover the adhesive.  Under the sentiment, adhere a strip of DSP cut at 3/4in by 2in.  For embellishments, cut out a MAGENTA MADNESS flower, a MISTY MOONLIGHT middle and a JUST JADE pair of leaves using the PIERCED BLOOMS DIES. Adhere them to card front under the sentiment.


1)For the card base, use a piece of acetate cut at 4-1/4in by 11in folded and creased at 5-1/2in.  On the inside of the back panel of the card base, adhere a piece of DSP from the DANDY GARDEN SUITE cut at 4in by 5-1/4in. 


For the front panel, cut a piece of BUMBLEBEE card stock at 3in by 4-1/4in and the striped DSP from the DANDY GARDEN SUITE cut at 2-3/4in by 4in.  Adhere them together then to the front of the acetate card base.  For the inside panel for the sentiment, cut a piece of BASIC WHITE card stock at 2-3/4in by 4in, line it up with the front panel and adhere it to the back of the card base on top of the DSP. 

3)Cut a SOFT SEAFOAM circle using the STITCHED SHAPE DIES. Then on a piece of BASIC WHITE scrap, stamp the dragonfly image using MEMENTO INK, color using the SO SAFFRON and SOFT SEAFOAM BLENDS.  Punch the image out using the DRAGONFLY PUNCH.  Adhere the circle to the center of the front panel and place the dragonfly using DIMENSIONALS. 


4)For the sentiment, cut a strip of MOSSY MEADOW card stock at 3/4in by 4-1/8in.  Stamp the sentiment using VERSAMARK INK and apply WHITE EMBOSSING POWDER.  Use the HEAT GUN to set.  Adhere it to the front of the card as shown. 


Here's a video tutorial to see how both cards came together.


I originally used the WINDOW SHEETS to make the card bases but found them to be a little flimsy.  I found a great solution on AMAZON. Below is the link.


All the other products can be purchased in my online store.  The link is below.


If you LOVE this project, don't forget to download the PDF tutorial.


Thanks for dropping by my blog.  I hope you feel inspired to try a CLEAR CARD yourself.  If you have any questions about this or any other project on my blog, don't hesitate to email me at blreed@comcast.net  Drop by next week.  I will be sharing two more CLEAR CARD designs.

Keep Stamping,

Barb Reed
The Wexford Stamper


Tuesday, March 16, 2021

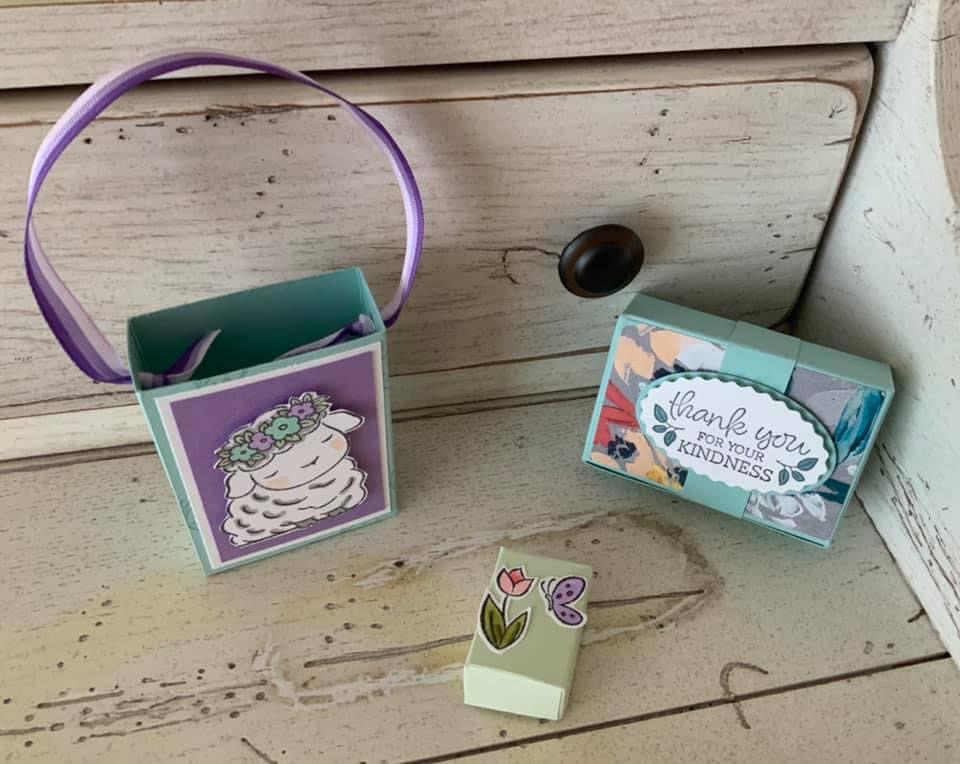
TEENY TINY TREAT BOXES featuring the SPRINGTIME JOY Stamp Set and the OVAL OCCASIONS Bundle


I think Spring is finally here in York PA.  We have had a nice string of beautiful days.  The daffodils are poking through and the birds are chirping way too early in the morning.  The projects on this post can be used for lots of occasions.  They would be great for Easter treats, spring birthdays, Mother's Day and even wedding or party favors.  

My first project is the Little Lamb Mini Gift Bag.  For the box, cut a piece of POOL PARTY card stock at 4in by 11in. Before scoring, randomly stamp the panel with the butterfly image from the SPRINGTIME JOY stamp set using POOL PARTY INK.  Then score on the LONG SIDE at 2-1/4in, 3-1/4in, 5-1/2in and 6-1/2in.  Score the SHORT SIDE at 1in. 

To make the front panel, cut a piece of BASIC WHITE card stock at 2-1/8in by 2-13/16in.  Layer on to that piece a piece of HIGHLAND HEATHER card stock cut at 1-7/8in by 2-5/8in.  On a scrap piece of BASIC WHITE, stamp the lamb image from the SPRINGTIME JOY stamp set in MEMENTO INK.  I used SMOKY SLATE, PETAL PINK, SOFT SEAFOAM, POOL PARTY and HIGHLAND HEATHER BLENDS.  I then “fussy cut” the lamb image and placed it on the mini treat bag using DIMENSIONALS.

On the back of the bag, I used a 2-3/4in by 1-5/8in size BASIC WHITE, scalloped, stitched rectangle from the STITCHED SO SWEETLY DIES. 


I stamped the sentiment at the top of the rectangle and stamped the flower images at the bottom.  I colored the flowers using HIGHLAND HEATHER, POOL PARTY and SOFT SEAFOAM BLENDS.  I then placed the rectangle on the back of the treat bag using DIMENSIONALS.  Finally, I punched holes in the sides of the box and tied a piece of TRICOLOR RIBBON for the handle. 

The second project is the Favor Box with a Belly Band.  I love this box because of its unique opening. 

Start with a piece of POOL PARTY card stock cut at 7in by 6-1/2in.  On the LONGSIDE, score at 2in and 5in.  Score at 1in, 3in, 4in and 6in on the SHORT SIDE.  With the 1in section at the top, score at 1-1/2in and 5-1/2in to the second score line.

After assembly, adhere a piece of FINE ARTS FLORAL DSP cut at 2-7/8in by 1-7/8in.  For the belly band stamp the sentiment on a scrap of BASIC WHITE card stock using a sentiment from the OVAL OCCASIONS stamp set.  

Using the DOUBLE OVAL PUNCH, punch out the sentiment using the scallop.  Using the second smallest oval in the STITCHED SHAPES DIES, cut out a POOL PARTY oval.  Layer those pieces using DIMENSIONALS.  Finally use a 3/4in strip of POOL PARTY card stock to make the belly band.

The last product is the teeniest.  This cute little treat box holds one pack of the MINI TIC TACS. 


I started with a piece of SOFT SEAFOAM card stock cut at 2-5/8in by 3-7/8in.  On the SHORT SIDE, score at 5/8in and 2in.  Score at 5/8in, 1-5/8in, 2-1/4in and 3-1/4in. Stamp the butterfly and the tulip image from the SPRINGTIME JOY stamp set on BASIC WHITE card stock with MEMENTO INK.  I colored the images with FLIRTY FLAMINGO, HIGHLAND HEATHER and OLD OLIVE BLENDS.  I “fussy cut” the images and adhered them to the front of the box using DIMENSIONALS.  The link below is where I got these cute little mini Tic Tac boxes

Mini Tic Tacs on Amazon

Below is the video tutorial that shows how these three boxes come together.


There you have it, THREE GREAT PROJECTS.  I hope you are inspired to try them yourself.  All the products used for these projects can be purchased in my online store.  Click below.

The Wexford Stamper's Online Store

I also created a downloadable PDF with all the pictures and dimensions, just for you.

PDF TUTORIAL

Thank you for dropping by my blog.  Next week I will be making a beautiful FUN FOLD EASTER CARD featuring the SPRINGTIME JOY stamp set and the HYDRANGEA HILL DSP.  Fun!!

Keep Stamping,

Barb Reed
The Wexford Stamper


Tuesday, March 2, 2021

A BEAUTIFUL SET OF VELLUM CARDS WITH A COORDINATING CARD BOX featuring the HYDRANGEA HILL SUITE


Spring is in the air here in PA.  We have had a few warm days recently and I saw my daffodils peeking out of the soil.  Just the thought of spring gives me feelings of hope and happiness.  One of my mom's favorite flowers in spring is the hydrangea.  I was always in awe of how she was able to keep them alive and beautiful all season long.  The gorgeous HYDRANGEA HILL SUITE shows off all the beautiful colors and blossoms of the flower.  I LOVE this DSP!!!


For this project, I used a design from my previous post for my cards and made a beautiful gift box for them.  I love the book design of the box.  It's a great way to gift the cards to a friend or loved one.  The cute little pocket on the inside allows you to include some stampers or mailing labels tool.


The cards are fun to make.  The unique design uses VELLUM CARD STOCK for the card front.


1)For the card stock portion of your card, cut a piece of GORGEOUS GRAPE at 5-1/4in by 5-3/4in.  Score at 1in on the SHORT SIDE.  Then cut a panel of the VELLUM CARDSTOCK at 4-1/4in at 5-1/2in.  Crease the score line of your cardstock.  This will be the back panel and the “hinge” of the card.  Put adhesive on the inside of the “hinge” slide in the VELLUM panel until if lines up with the back panel and fold down the card stock.  This is the card base for your card and can be replicated in any color to match any DSP.  Adhere a 1in by 5-1/2 in piece of GORGEOUS GRAPE card stock to the inside of the “hinge” to cover the adhesive on the vellum.

2)Next cut two pieces of the coordinating DSP from the HYDRANGEA HILL paper stack. One at 3-7/8in by 2-7/8in and one at 1in by 5-1/2in.  Adhere the strip to the inside of the card base at the far-right edge.  Next cut two pieces of card stock at 3in by 4in.  One in BASIC WHITE for the inside and one in a color that coordinates with the DSP.  I chose GORGEOUS GRAPE. 

3)Layer the DSP on the colored card stock and adhere that panel to the front of the card, putting adhesive on the left edge of the panel only and adhering it to the edge of the “hinge”. 

4)Carefully adhere the BASIC WHITE panel on the inside of the card.  Be sure it lines up with the panel on the card front so it can’t be seen when the card is closed.

5)To create the embellishments for the front of the card, I used a BASIC WHITE stitched circle from the STITCHED SHAPES DIES.  I then “fussy cut” a hydrangea plant image from the DSP and adhered it to the circle.  I stamped a sentiment on a BASIC WHITE strip of card stock cut at 3-4in by 2-1/2in.  I adhered that to the center of the circle using DIMENSIONALS.  Finally, I tied a piece of BASIC WHITE BAKER’S TWINE to the fold of the card.

The card box is a simple design.  It includes a piece of cardstock for the cover and then a pocket and a box to add to the inside.


1)To make the card box cover, start with a piece of GORGEOUS GRAPE card stock cut at 6-1/2in by 10-3/8in.  Score at 4-3/4in from both ends.  Using the TRIO PUNCH, round all four corners.  For the DSP on the cover, cut a piece at 4-1/2in by 6-1/4in, rounding the outside edge corners before adhering. 

2)Next, cut a piece of GORGEOUS GRAPE card stock at 8in by 7-1/2in for the box portion.  On the LONG SIDE, score at 3/4in, 5-1/4in and 6in.  On the SHORT SIDE, score at 3/4in from both ends.  You will need a DSP panel cut at 1-3/4in by 5-3/4in for the front of the box where the cards tuck in.  Assemble the box and adhere it to the right side of the cover.  Add the DSP panel. 

3)For the pocket, cut a piece of coordinating DSP at 10-1/2in by 5-1/2in.  On the LONG SIDE, score at 6-1/4in and 9-3/4in.  On the SHORT SIDE at ½in on both sides.  Fold up and glue to create the pocket, then adhere to the inside of the left side of the cover. 

4)For the embellishments on the front of the box, use WHITE EMBOSSING POWDER to place your sentiment on the GORGEOUS GRAPE die cut from the HAPPY HIPPOS DIE SET.  Add another “fussy cut” hydrangea plant at the bottom left corner, a bow using the TRICOLOR RIBBON and some OPAL ROUNDS.

Below is a video tutorial showing how the cards and card box comes together.


Would you like a PDF tutorial?  Download and print out a copy for your files.  Click below.

PDF TUTORIAL

All products used in this project can be found in my online store.  Click on the link below.

The Wexford Stamper's Online Store

Thanks so much for dropping by my blog.  I hope you are inspired to make something yourself.  If you have any questions about this or any other project, don't hesitate to email me at blreed@comcast.net. Come back again soon.

Keep Stamping,

Barb Reed
The Wexford Stamper


Saturday, July 25, 2020

Need something for a Baby Birthday? HIPPO HAPPINESS can help you out. Mini Gift Bag and Coordinating Card


So excited to show other projects using the HIPPO HAPPINESS BUNDLE.  For this post I made a cute little gift bag using a 6 by 6 piece of designer series paper using the paper from the PLAYING WITH PATTERNS SUITE.  This bundle was designed by Robyn Cardon, a Stampin' Up demonstrator celebrating here million dollar sales milestone.  Pretty amazing.  This bundle is "SO ROBYN' with the whimsical animals and the "punny" sentiments.  Not only does she include dies to cut out all the critters, but she also has amazing and unique label dies that make this bundle so versatile.


I also created a card to coordinate with the gift bag.  The gift bag I make in the video used Purple Posy, just like the card.


To make the bag, I used two 6in by 6in pieces of paper from the PLAYING WITH PATTERNS PAPER STACK.  Using the SIMPLY SCORED SCORING TOOL, I scored both pieces of paper at 1-1/2in on three sides.  The side I did not score is the top of the bag.  The video tutorial below shows how the gift bag came together as well as the coordinating card.   Enjoy.


If you have any questions about any of my projects, don't hesitate to email me at blreed@comcast.net.  If you are looking to purchase any of the products you saw on this post or in the video, click on the link below to my online store.


Next week I will be doing a CHRISTMAS IN JULY series featuring the SNOWFLAKE SPLENDOR SUITE, available August 4th to my customers.  Thanks again for stopping by.  Please share my blog with your crafty friends.  Take care.

Barb Reed
The Wexford Stamper


A Unicorn Treat Box and a Thank "Ewe" Card using the HIPPO HAPPINESS BUNDLE


This week's posts feature the adorable HIPPO HAPPINESS BUNDLE from the Annual Catalog.  This stamp set is so adorable, with unicorns, sheep, hippo and butterfly images to help you make whimsical cards and 3D items for family and friends. In addition to the images, you get a great set of dies with amazing label dies in three different unique designs.  They make the bundle so versatile.  I'm sure I will be using these labels for my holiday cards.  The project today is a favorite of mine, the Unicorn Treat Box.  I also made a cute Thank "Ewe" card. 


In addition to the featured bundle, I also used the bright and bold paper from the PLAYING WITH PATTERNS SUITE.  The color palate went beautifully with my creations.


To make the box, I started with a piece of MAGENTA MADNESS CARD STOCK cut at 7in by 5-1/2in.  On the LONG side, I scored at 1in, 5-1/2in, 6-1/2in.  On the SHORT side, I scored at 1in, 2-1/2in, 3-1/2in,, 5in,   The DSP panel used on the front of the box measures 1-3/8in by 4-3/8in.  In the video tutorial below, you can see how the project came together;  I also shared some tips on how to get a good image when you are doing two-step stamping.  


Check out my next blog post too. I'll be making two more projects with this bundle, this time featuring the happy little hippo.  Please comment and let me know what you think.  Thanks for stopping by.  If you have any questions about any of the creations on my blog, email me at blreed@comcast.net and I'll be glad to follow up with you.  If you are interested in any of the products shown in the videos, you can purchase them in my online store.  Click below.


Thanks for visiting my blog.  Please share with others you know who love some crafty inspiration.  Take care and keep stamping.


Barb Reed
The Wexford Stamper


Thursday, July 16, 2020

A CUTE TEA GIFT BOX and COORDINATING CARD USING THE LOVELY YOU BUNDLE


Tea Gift Box

Today's project is a card and coordinating treat box.  I used the LOVELY YOU BUNDLE.  This bundle includes the beautiful stamp set (LOVELY YOU) with mixed font sentiments and the amazing LOVELY LABELS PICK A PUNCH.  This punch is a "must have" for all card makers.  It allows you to  make three different sizes of labels (1/2in, 3/4in and 1in in width).  You can layer them too for a whole new look.  It's fun!!


I used designer series paper from the FLOWERS FOR EVERY SEASONS PAPER PACK.  The designs are just beautiful and include a variety of flower patterns with coordinating neutral designs on the back.  


To make the box, I started with a piece of JUST JADE CARD STOCK cut at 7in by 5-5/8Blin.  On the LONG SIDE, I scored at 2-1/2in, 3-1/4in, 5-3/4in and 6-1/2in.  On the SHORT side, I scored at 1/2in, 1-1/4in, 4-3/8in and 5-1/8in. The DSP panel on the front of the box is cut at 2-5/16in by 2-15/16in.  I used the SMALL BLOOM PUNCH for the flowers and the STITICHED SHAPES DIES for the circle. Below is a template of the box after I creased on all the score lines and cut off the excess card stock.


In the video tutorial below, you can see how the box comes together.


For the card, I used BUMBLEBEE CARD STOCK for the card base.  I used a coordinating piece of the FLOWERS FOR EVERY SEASONS PAPER PACK cut at 4in by 5-1/4in and adhered that to the card base.  I cut out a JUST JADE FRAME using the ORNATE LAYERS DIES.  This beautifully intricate frame makes the card look so lovely.  I then cut a piece of the FLOWERS FOR EVERY SEASONS PAPER PACK to fit inside the frame (3-1/2in by 2-1/4in).  i adhered that to the center of the card front using TOMBOW ADHESIVE.  To make the label I took a piece of MAGENTA MADNESS CARD STOCK cut at 3-1/2in by 1in. and a piece of WHISPER WHITE CARD STOCK cut at 3-1/4in by 3/4in.  I stamped my sentiment on the WHISPER WHITE strip then using the LOVELY LABELS PICK A PUNCH, I rounded the ends of both strips.  Using TOMBOW ADHESIVE, I glued them together then placed them on the card front using DIMENSIONALS.  i added some INCOLOR ENAMEL DOTS to finish the card.


If you have any questions about these projects, please contact me at blreed@comcast.net.  Check back to my blog often for more inspiration.  Products used for these projects can be purchased in my online store.


Thanks for visiting my blog.  I hope you feel inspired to make some projects of your own.

Keep Stamping,

Barb Reed
The Wexford Stamper