Showing posts with label Easter Treat Box. Show all posts

Tuesday, March 29, 2022

CREATE A CUTE MINI GIFT BAG USING THE HELLO LADYBUG BUNDLE


My love for the LADYBUG BUNDLE has no bounds.  I had so much fun creating projects using this bundle and I'm excited about my latest mini gift bag.  It's a perfect size for some Easter goodies. Here is what the bundle includes:


Start with a piece of DSP cut at 4-1/2in by 9-1/2in.  For the sample above, I used paper from the HEART & HOME Designer Series Paper pack and for the video tutorial I used a piece from the HAND PENNED DSP.  Anything in your stash that is a floral will be perfect for this project.  Starting on the SHORT SIDE, score at 1-1/2in.  

Turn your paper so that the score line you just made is close to the top of your scoring board.  Then on the LONG SIDE, score JUST TO THE SCORE LINE, at 1-1/2in, 4-1/2in, 6in, then across the entire with of the paper at 9in.  Fold on the score lines and snip all the short score lines up to the horizontal score line to create the tabs for the bottom of the gift bag.  

Place TEAR N TAPE on the thin vertical panel and adhere it to the other side of the panel.  Then using TOMBOW fold up and adhere the rectangular and square tabs to create the bottom.  Cut two strips of coordinating card stock at 5-1/2in by 1/2in for the handles and adhere them to the top of the bag as shown using TEAR N TAPE.  

For the flower, punch eight petals using the LADYBUG PUNCH.  Choose a card stock color that coordinates with your DSP.  Place one of the CRUMB CAKE 1-3/8in CIRCLES in front of you and start creating the flower by adhering petals in a circle, overlapping as you go.  I used GLUE DOTS so I could move the petals around to get the best result.  Once you have finished arranging the petals, place the second CRUMB CAKE circle on top for the center.

Next, using the LADYBUG PUNCH, punch out a ladybug body using BASIC BLACK card stock.  On a piece of BASIC WHITE card stock, stamp the wings using a coordinating ink color and punch them out.  Adhere the wings to the body using DIMENSIONALS then to the bag using DIMENSIONALS.  

The link below is a video tutorial that shows how the project comes together.


Click the link below for a downloadable PDF tutorial


All the products used in this project are available in my online store.  Click below and get shopping.


Thanks for stopping by my blog.  I hope you feel inspired to be creative yourself.  Come back soon for some more great project ideas.

Keep Stamping,

Barb Reed
The Wexford Stamper


Tuesday, March 15, 2022

QUICK & EASY TREAT HOLDERS FOR ST. PATRICK'S DAY and EASTER

Happy March friends.  Finally some warm weather.  Time to so some fun spring holiday crafting.  First, of course, comes St. Patrick's Day.  Thought a cute little green treat holder filled with chocolate gold foiled coins would be the perfect gift for those cute little leprechauns.  


This is a quick and easy design.  Start with a piece of DSP cut at 4-1/2in by 8in.  On the LONG side, score at 1-1/2in, 3in, 4-1/2in, 6in and 7-1/2in.  Score at 1-1/2in on the SHORT side.  Fold and crease on all the score lines.  Cut of the small rectangle piece at the right bottom of the panel then cut up each vertical score line to the first horizontal score line.

Use TOMBOW to adhere the small tab to the opposite side of the panel.  Turn the box so that the flaps are on the top.  Put TOMBOW on the underside of all but one flap.  Fold them down carefully to assemble the box.  To finish off the bottom, adhere a 2in circle of the same DSP or coordinating card stock.

Next, pinch together each of the top corners to make a fold line in between.  The opening will then resemble a star.  Pinch those same corners and punch a hole with a 1/8in punch close to the center of the top.

For the tag, I used the die from the Valentine's Day bundle.  I used the sentiment from the OVAL OCCASIONS bundle, covering up the flowers with sticky notes before adding ink.  The shamrock was make using card stock and cutting out the row of small hearts from the same Valentine's Day bundle.  Glue together three hearts to form the shamrock with a tiny strip for the stem.  Place it on the tag with DIMENSIONALS.  

Thread ribbon through holes in the box, through the tag and tie a bow.  The video below shows how the treat box comes together.


With Easter around the corner, it's never too early to start on "bunny boxes."  This treat holder was inspired by Angie from CHIC N SCRATCH.  I took her amazing idea and just changed out the DSP and the sentiment.  


For the treat holders base you will need two pieces of card stock, one cut at 2in by 8-1/4in and one cut at 3-7/8in by 3in.  On the first, score at 3-1/2in from both ends.  Use the TAG TOPPER PUNCH to punch both ends of this strip.  

Score the second panel at 1in on all four sides.  Fold and crease then snip the tabs apart.  Adhere the tabs to the side panels to form a box.  Put TOMBOW on the bottom of the box, center and adhere it to the middle panel of the first piece.

To decorate, add a coordinating piece of DSP cut at 1-3/4in by 2-1/2in.  I used paper from the PANSY PETALS SUITE but you can use anything "springy".  Adhere it to the front of the treat holder and tie up the ends using coordinating ribbon.

For the bunny, use the LADY BUG PUNCH and the MEDIUM DAISY PUNCH. Punch out both die cuts using BASIC BLACK card stock.  Cut off the lady bug's antennae and place two petals, cut from the daisy punch at the top of the head to form ears.  Before placing the bunny on the cut out a 2in circle the same color as the base of the treat holder.  Then cut out a coordinating scallop in WHISPER WHITE.  Layer them on the front and add the bunny with DIMENSIONALS.  For the sentiment, I cut out the HAPPY SPRING portion of a sentiment from the TIMELESS TULIPS stamp set.

Check out the video below to see how this cute little bunny treat holder came together.  


Click the link below to get a downloadable PDF for both projects.


If you would like any of the products used in these projects, click below to get to my online store.


Thanks for dropping by my blog.  I hope you feel inspired to try something yourself.  Come back soon.  I will be sharing more Easter and Spring projects.

Take care and keep on stamping,

Barb Reed
The Wexford Stamper


Tuesday, March 16, 2021

TEENY TINY TREAT BOXES featuring the SPRINGTIME JOY Stamp Set and the OVAL OCCASIONS Bundle


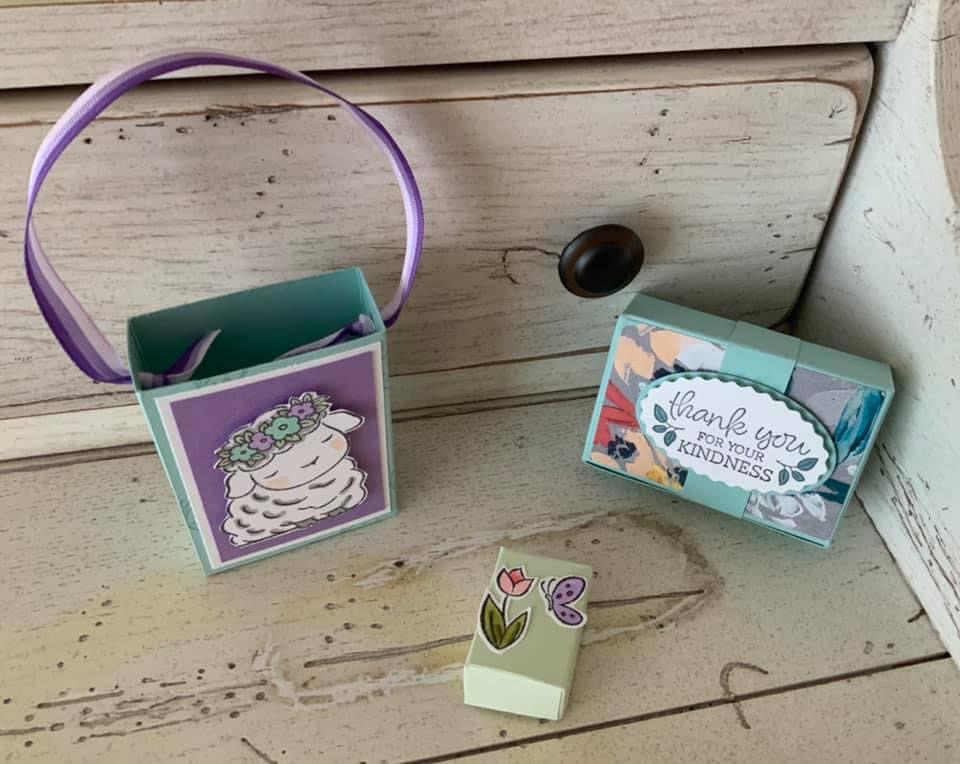
I think Spring is finally here in York PA.  We have had a nice string of beautiful days.  The daffodils are poking through and the birds are chirping way too early in the morning.  The projects on this post can be used for lots of occasions.  They would be great for Easter treats, spring birthdays, Mother's Day and even wedding or party favors.  

My first project is the Little Lamb Mini Gift Bag.  For the box, cut a piece of POOL PARTY card stock at 4in by 11in. Before scoring, randomly stamp the panel with the butterfly image from the SPRINGTIME JOY stamp set using POOL PARTY INK.  Then score on the LONG SIDE at 2-1/4in, 3-1/4in, 5-1/2in and 6-1/2in.  Score the SHORT SIDE at 1in. 

To make the front panel, cut a piece of BASIC WHITE card stock at 2-1/8in by 2-13/16in.  Layer on to that piece a piece of HIGHLAND HEATHER card stock cut at 1-7/8in by 2-5/8in.  On a scrap piece of BASIC WHITE, stamp the lamb image from the SPRINGTIME JOY stamp set in MEMENTO INK.  I used SMOKY SLATE, PETAL PINK, SOFT SEAFOAM, POOL PARTY and HIGHLAND HEATHER BLENDS.  I then “fussy cut” the lamb image and placed it on the mini treat bag using DIMENSIONALS.

On the back of the bag, I used a 2-3/4in by 1-5/8in size BASIC WHITE, scalloped, stitched rectangle from the STITCHED SO SWEETLY DIES. 


I stamped the sentiment at the top of the rectangle and stamped the flower images at the bottom.  I colored the flowers using HIGHLAND HEATHER, POOL PARTY and SOFT SEAFOAM BLENDS.  I then placed the rectangle on the back of the treat bag using DIMENSIONALS.  Finally, I punched holes in the sides of the box and tied a piece of TRICOLOR RIBBON for the handle. 

The second project is the Favor Box with a Belly Band.  I love this box because of its unique opening. 

Start with a piece of POOL PARTY card stock cut at 7in by 6-1/2in.  On the LONGSIDE, score at 2in and 5in.  Score at 1in, 3in, 4in and 6in on the SHORT SIDE.  With the 1in section at the top, score at 1-1/2in and 5-1/2in to the second score line.

After assembly, adhere a piece of FINE ARTS FLORAL DSP cut at 2-7/8in by 1-7/8in.  For the belly band stamp the sentiment on a scrap of BASIC WHITE card stock using a sentiment from the OVAL OCCASIONS stamp set.  

Using the DOUBLE OVAL PUNCH, punch out the sentiment using the scallop.  Using the second smallest oval in the STITCHED SHAPES DIES, cut out a POOL PARTY oval.  Layer those pieces using DIMENSIONALS.  Finally use a 3/4in strip of POOL PARTY card stock to make the belly band.

The last product is the teeniest.  This cute little treat box holds one pack of the MINI TIC TACS. 


I started with a piece of SOFT SEAFOAM card stock cut at 2-5/8in by 3-7/8in.  On the SHORT SIDE, score at 5/8in and 2in.  Score at 5/8in, 1-5/8in, 2-1/4in and 3-1/4in. Stamp the butterfly and the tulip image from the SPRINGTIME JOY stamp set on BASIC WHITE card stock with MEMENTO INK.  I colored the images with FLIRTY FLAMINGO, HIGHLAND HEATHER and OLD OLIVE BLENDS.  I “fussy cut” the images and adhered them to the front of the box using DIMENSIONALS.  The link below is where I got these cute little mini Tic Tac boxes

Mini Tic Tacs on Amazon

Below is the video tutorial that shows how these three boxes come together.


There you have it, THREE GREAT PROJECTS.  I hope you are inspired to try them yourself.  All the products used for these projects can be purchased in my online store.  Click below.

The Wexford Stamper's Online Store

I also created a downloadable PDF with all the pictures and dimensions, just for you.

PDF TUTORIAL

Thank you for dropping by my blog.  Next week I will be making a beautiful FUN FOLD EASTER CARD featuring the SPRINGTIME JOY stamp set and the HYDRANGEA HILL DSP.  Fun!!

Keep Stamping,

Barb Reed
The Wexford Stamper


Tuesday, March 9, 2021

Adorable Spring Treat Boxes featuring the SPRINGTIME JOY Stamp Set

Spring is almost here in York, PA.  The weather hasn't always cooperated but I can tell it's coming because the days are getting longer and the stores are stocked with Easter treats.  The SPRINGTIME JOY Stamp Set, with its adorable animal images, is the perfect starting point for Spring treat boxes.


My first project is this quick and easy cookie pouch.  I purchased individually wrapped coconut macaroons on Amazon to put inside but many other cookies would fit.  The picture below shows HYDRANGEA HILL Designer series paper but I made over twenty of these using up all my extra paper.  I just changed the color of the tag and the BLENDS I used to color the flowers.  So simple.  Here's the Amazon link.

Poppies Chocolate Covered Macaroons


1)Start with a piece of HYDRANGEA HILL Designer Series Paper cut at 10-1/2in by 5in.  On the SHORT SIDE, cut at 1/2in from both sides.  On the LONG SIDE, score at 2in and 6in, 6-1/2in. Using your PAPER SNIPS, cut the 1/2in margins off the 2in panel of the DSP.  Cut loose the square tabs along the outside edges of the paper.  Using the TRIO PUNCH, round the corners on that panel as well.  Adhere the outside panels together to create the pouch.    

2)For the tag, die cut the label from the PIERCED BLOOMS DIES using SEASIDE SPRAY card stock.  Stamp the bunny image on BASIC WHITE card stock using MEMENTO BLACK INK.  Color the bunny using SMOKY SLATE and PETAL PINK BLENDS.  For the flower crown, I used HIGHLAND HEATHER, SEASIDE SPRAY and SOFT SEAFOAM BLENDS.  "Fussy cut" the bunny image and adhere it to the tag with dimensionals.  Stamp the WELCOME SPRING sentiment on a 1/2in strip of SOFT SEAFOAM card stock.  Punch a hole in the top of the tag and tie it to the treat pouch using the GORGEOUS GRAPE RIBBON.  

Are you a PEEPS fan?  This can be a very polarizing question.  Some people love them, some loathe them.  Whichever side of the issue you are on, you know it's almost Spring when they pop up in the grocery store.  For my PEEPS Bunny Treat Box, I purchased the four pack at my local Target.  I was inspired to create this box by Susan Levasseur at WOW NOLA Creations.  Thanks Susan for this adorable idea.


1)For the box, cut a piece of HIGHLAND HEATHER at 9-1/2in by 8-1/2in.  Score at 1in, 4-1/4in, 5-1/4in and 8-1/2in on the LONG SIDE.  On the SHORT SIDE, score at 1/2in, 1-1/2in, 7in and 8in.  Before assembly, cut a window out of the lid of the box using the 2-1/8in square from the STITCHED SHAPES DIES.


2) To make the window frame, use the same square die along with the next largest.  Nest them together on a scrap piece of BASIC WHITE card stock and run them through the CUT & EMBOSS MACHINE.  Using TOMBOW liquid adhesive, adhere the window frame to the box.

3) On another scrap of BASIC WHITE, stamp the bunny and basket images from the SPRINGTIME JOY stamp set using MEMENTO BLACK INK.  Color the bunny using SMOKY SLATE BLENDS and PETAL PINK for the bunny’s nose and cheeks. For the flower crown I used DAFFODIL DELIGHT, HIGHLAND HEATHER and SOFT SEAFOAM.  For the basket, use CRUMB CAKE BLENDS and HIGHLAND HEATHER, SOFT SEAFOAM and DAFFODIL DELIGHT BLENDS for the eggs. 

4) Using the PIERCED BLOOMS DIES, cut out the label using BASIC WHITE card stock and small flowers using SO SAFFRON and HIGHLAND HEATHER card stock. Then I stamped the sentiment on the label using MEMENTO INK.  Stamp the WELCOME SPRING sentiment on a 1/2in strip of BLUSHING BRIDE card stock using the MEMENTO as well.  "Fussy cut" the bunny and basket images and adhere the pieces as shown on the picture above.


The video below shows how these two projects came together.


I have also included a downloaded PDF, just click below and print it out for your records.

PDF TUTORIAL


All the products used for these projects can be purchased in my online store.  Just click below.

 The Wexford Stamper's Online Store

Thank you for stopping by my blog.  If you have any questions about these or any other projects on my blog, don't hesitate to email me at blreed@comcast.net.  I hope you are inspired to create something on your own.

Keep Stamping,

Barb Reed

The Wexford Stamper


Thursday, March 26, 2020

Cute Foil Egg Treat Box using the Layered with KIndness Stamp Set and the Label Me Fancy Punch


As I write this blog post the sun is finally shining through the window after a long period of cloudy days.  I'm reminded again that Spring is on its way.  With Spring comes the arrival of Easter and nothing screams Easter more than FOIL CHOCOLATE EGGS.  

These cute little foil egg boxes measure about 8 inches long and hold about 6 foil eggs.  I started with a piece of card stock, in the picture above I used PACIFIC POINT, MELON MAMBO and DAFFODIL DELIGHT. The card stock is cut at 3-1/2in by 8in.  Using my SIMPLY SCORED SCORING TOOL, I scored on the long side at 1/2in, 1-1/4in, 6-3/4in and 7-1/2in.  On the short side, I scored at 3/4in, 1-1/2in, 2-1/4in and 3in.  Before assembling, I adhered to each of the four panels, strips of the 6X6 BRIGHTS DESIGNER SERIES PAPER in the coordinating color.  The strips are cut at 5/8in by 5-1/4in.  Lastly, to create the small window, I took the CLASSIC LABEL PUNCH and punch out a window about 1-1/2in in on the panels with DSP. 


Using TOMBOW LIQUID GLUE, I adhered the box together along the side flap.  I pinched closed one end and secured it with two GLUE DOTS.  I put the foil eggs in and secured the other end.  To embellish, I tied a pretty box using the POLKA DOT TULLE RIBBON.  


For the tag, I used the amazing LAYERED WITH KINDNESS stamp set and coordinating LABEL ME FANCY PUNCH. 


 I stamped the "FOR MY FRIEND" sentiment in the coordinating color on a scrap of WHISPER WHITE CARD STOCK and punched it out.  I used a DIMENSIONAL to secure it to the box.  And that's it.  Easy and fun.  I could make a million of them.  At least until my unusually large stockpile of foil eggs from Amazon runs out.  Here is the link to those yummy foil eggs.


Below is the YouTube video tutorial showing how this fun project came together.


If you have any questions about this or any project on my blog, please don't hesitate to email me (blreed@comcast.net) or message me.  If you are interested in any of the products shown in my projects, you can go to my online store to purchase them.  Just click below.


Thanks again and Keep Stamping,
Barb Reed
The Wexford Stamper